Showing posts with label Christmas. Show all posts

Wednesday, December 2, 2015

Christmas Card Featuring Lawn Fawn

Hello everybody, welcome to Crafty Time 4U! Today I'm at the Marker POP blog sharing some Christmas cheer in a form of a card, using Lawn Fawn stamps, dies, and papers.
Let me show you the card and I'll tell you a little bit more about it

20151201_231255
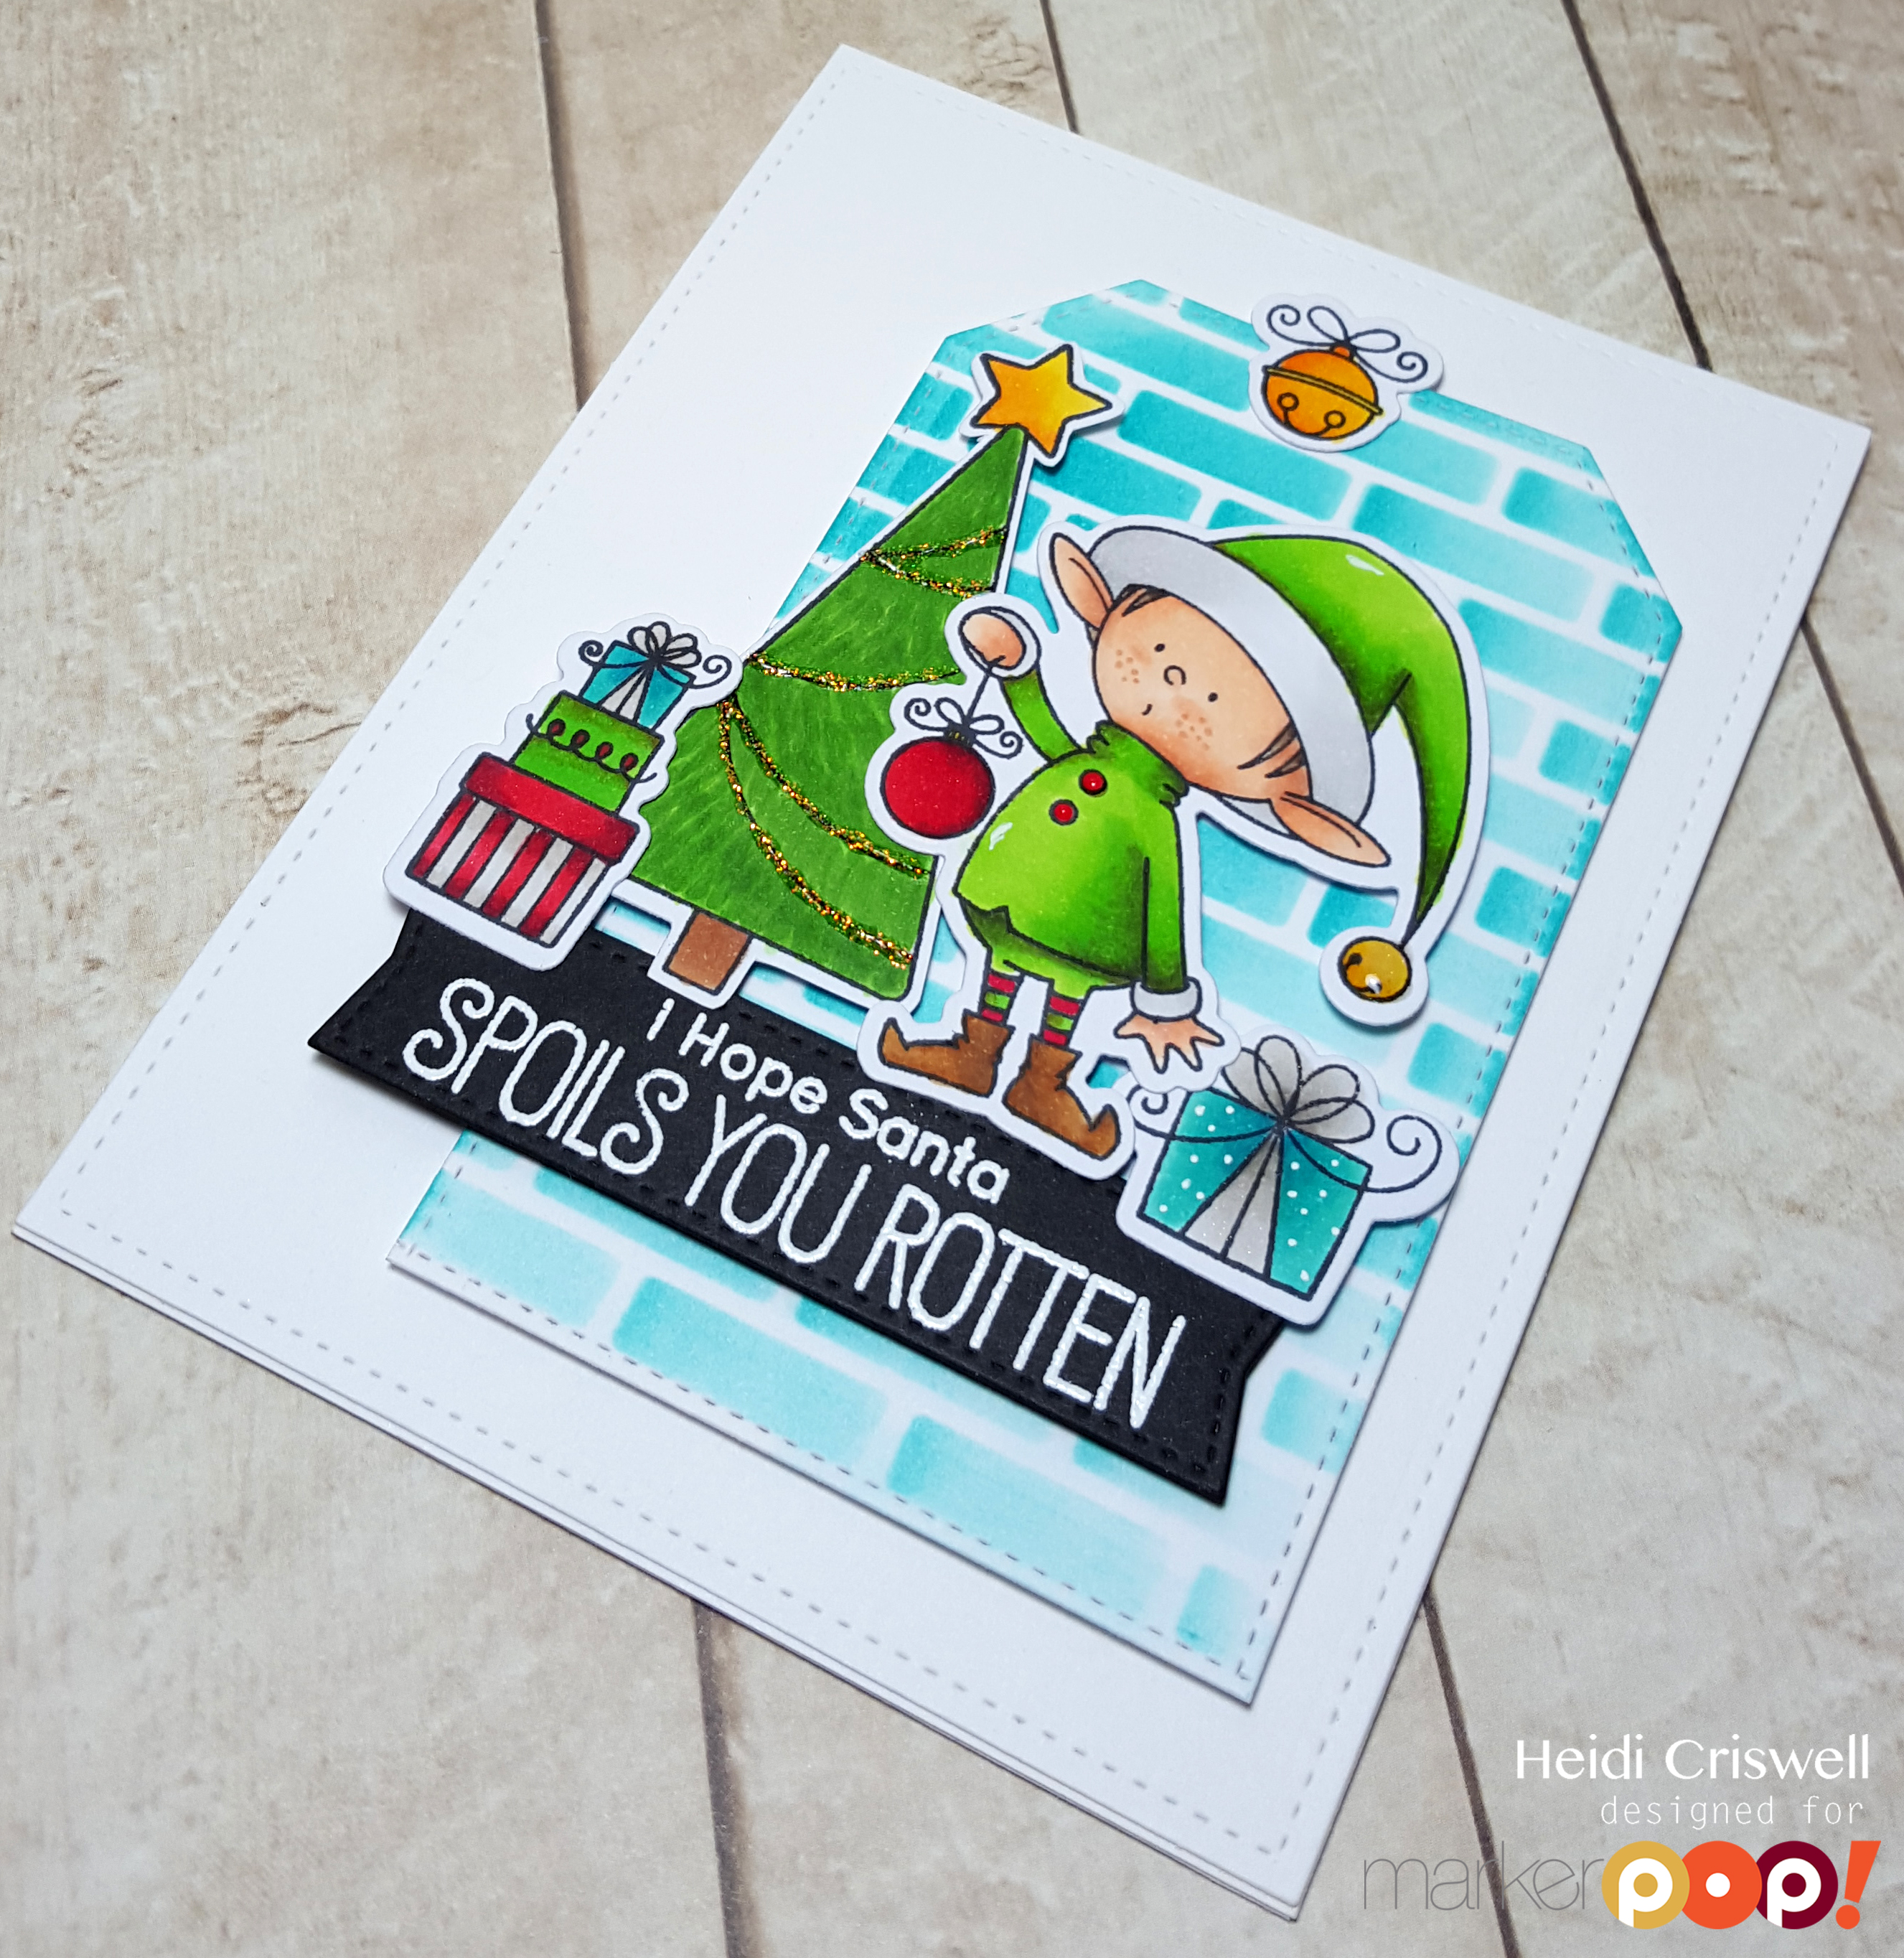
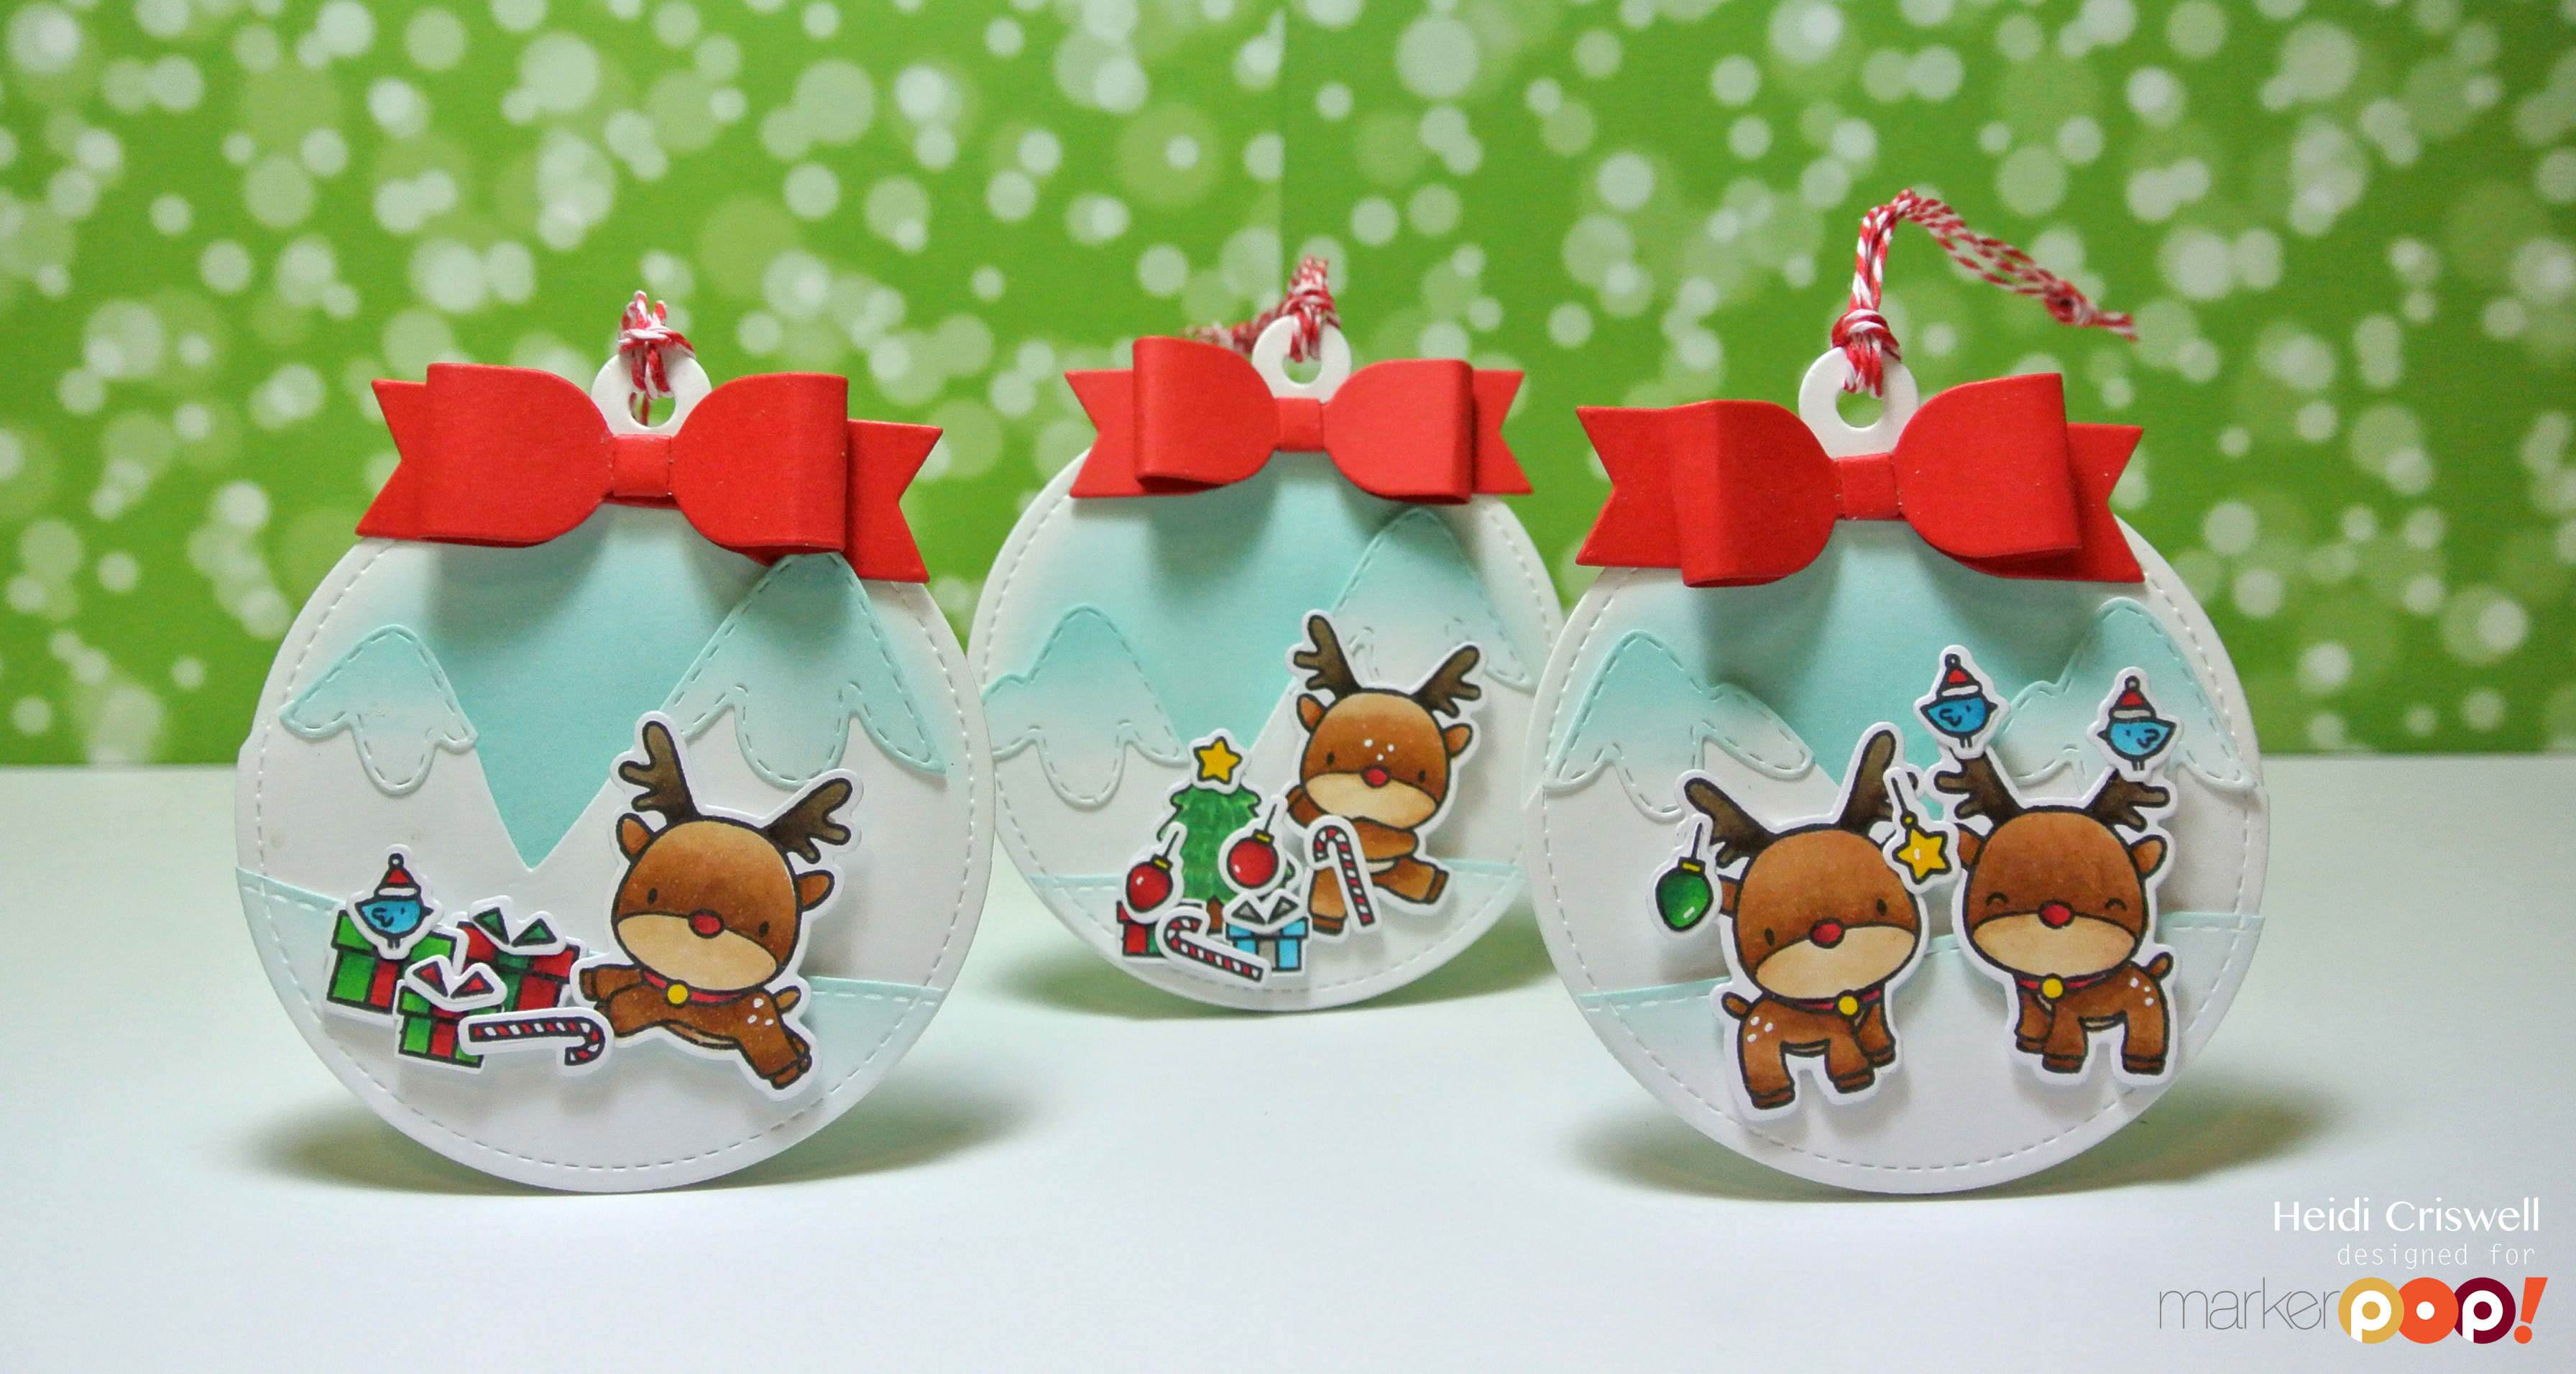
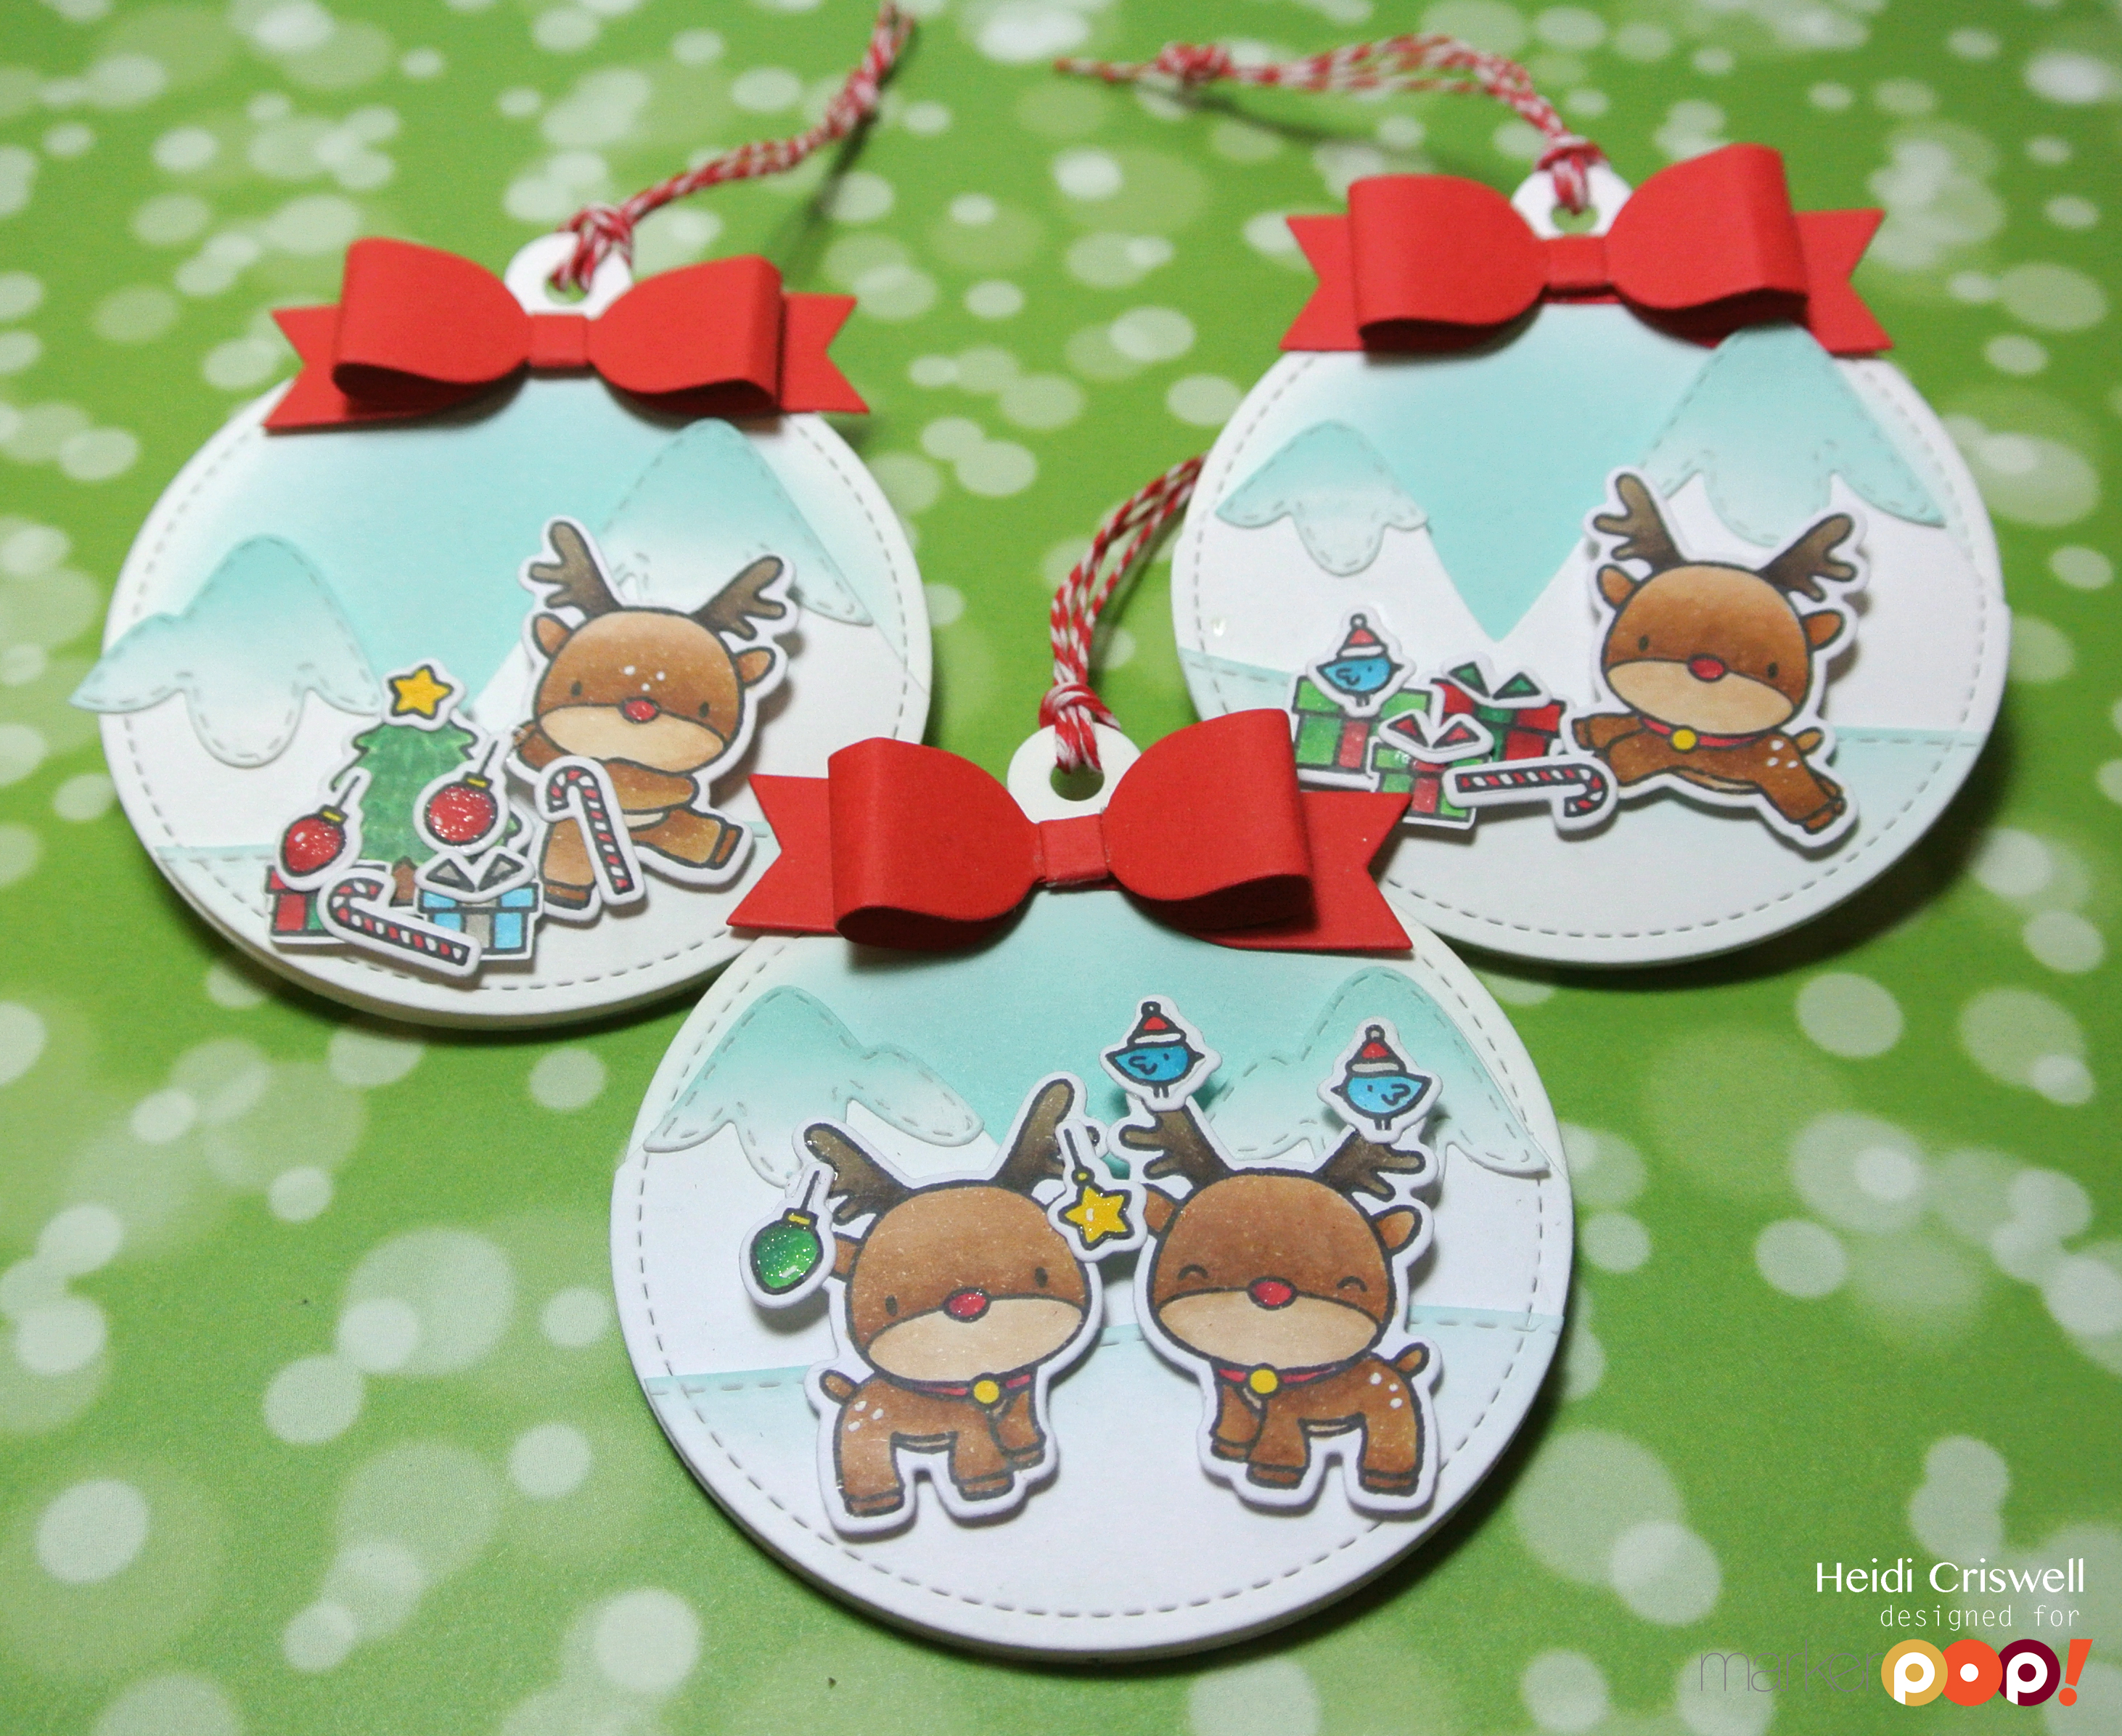
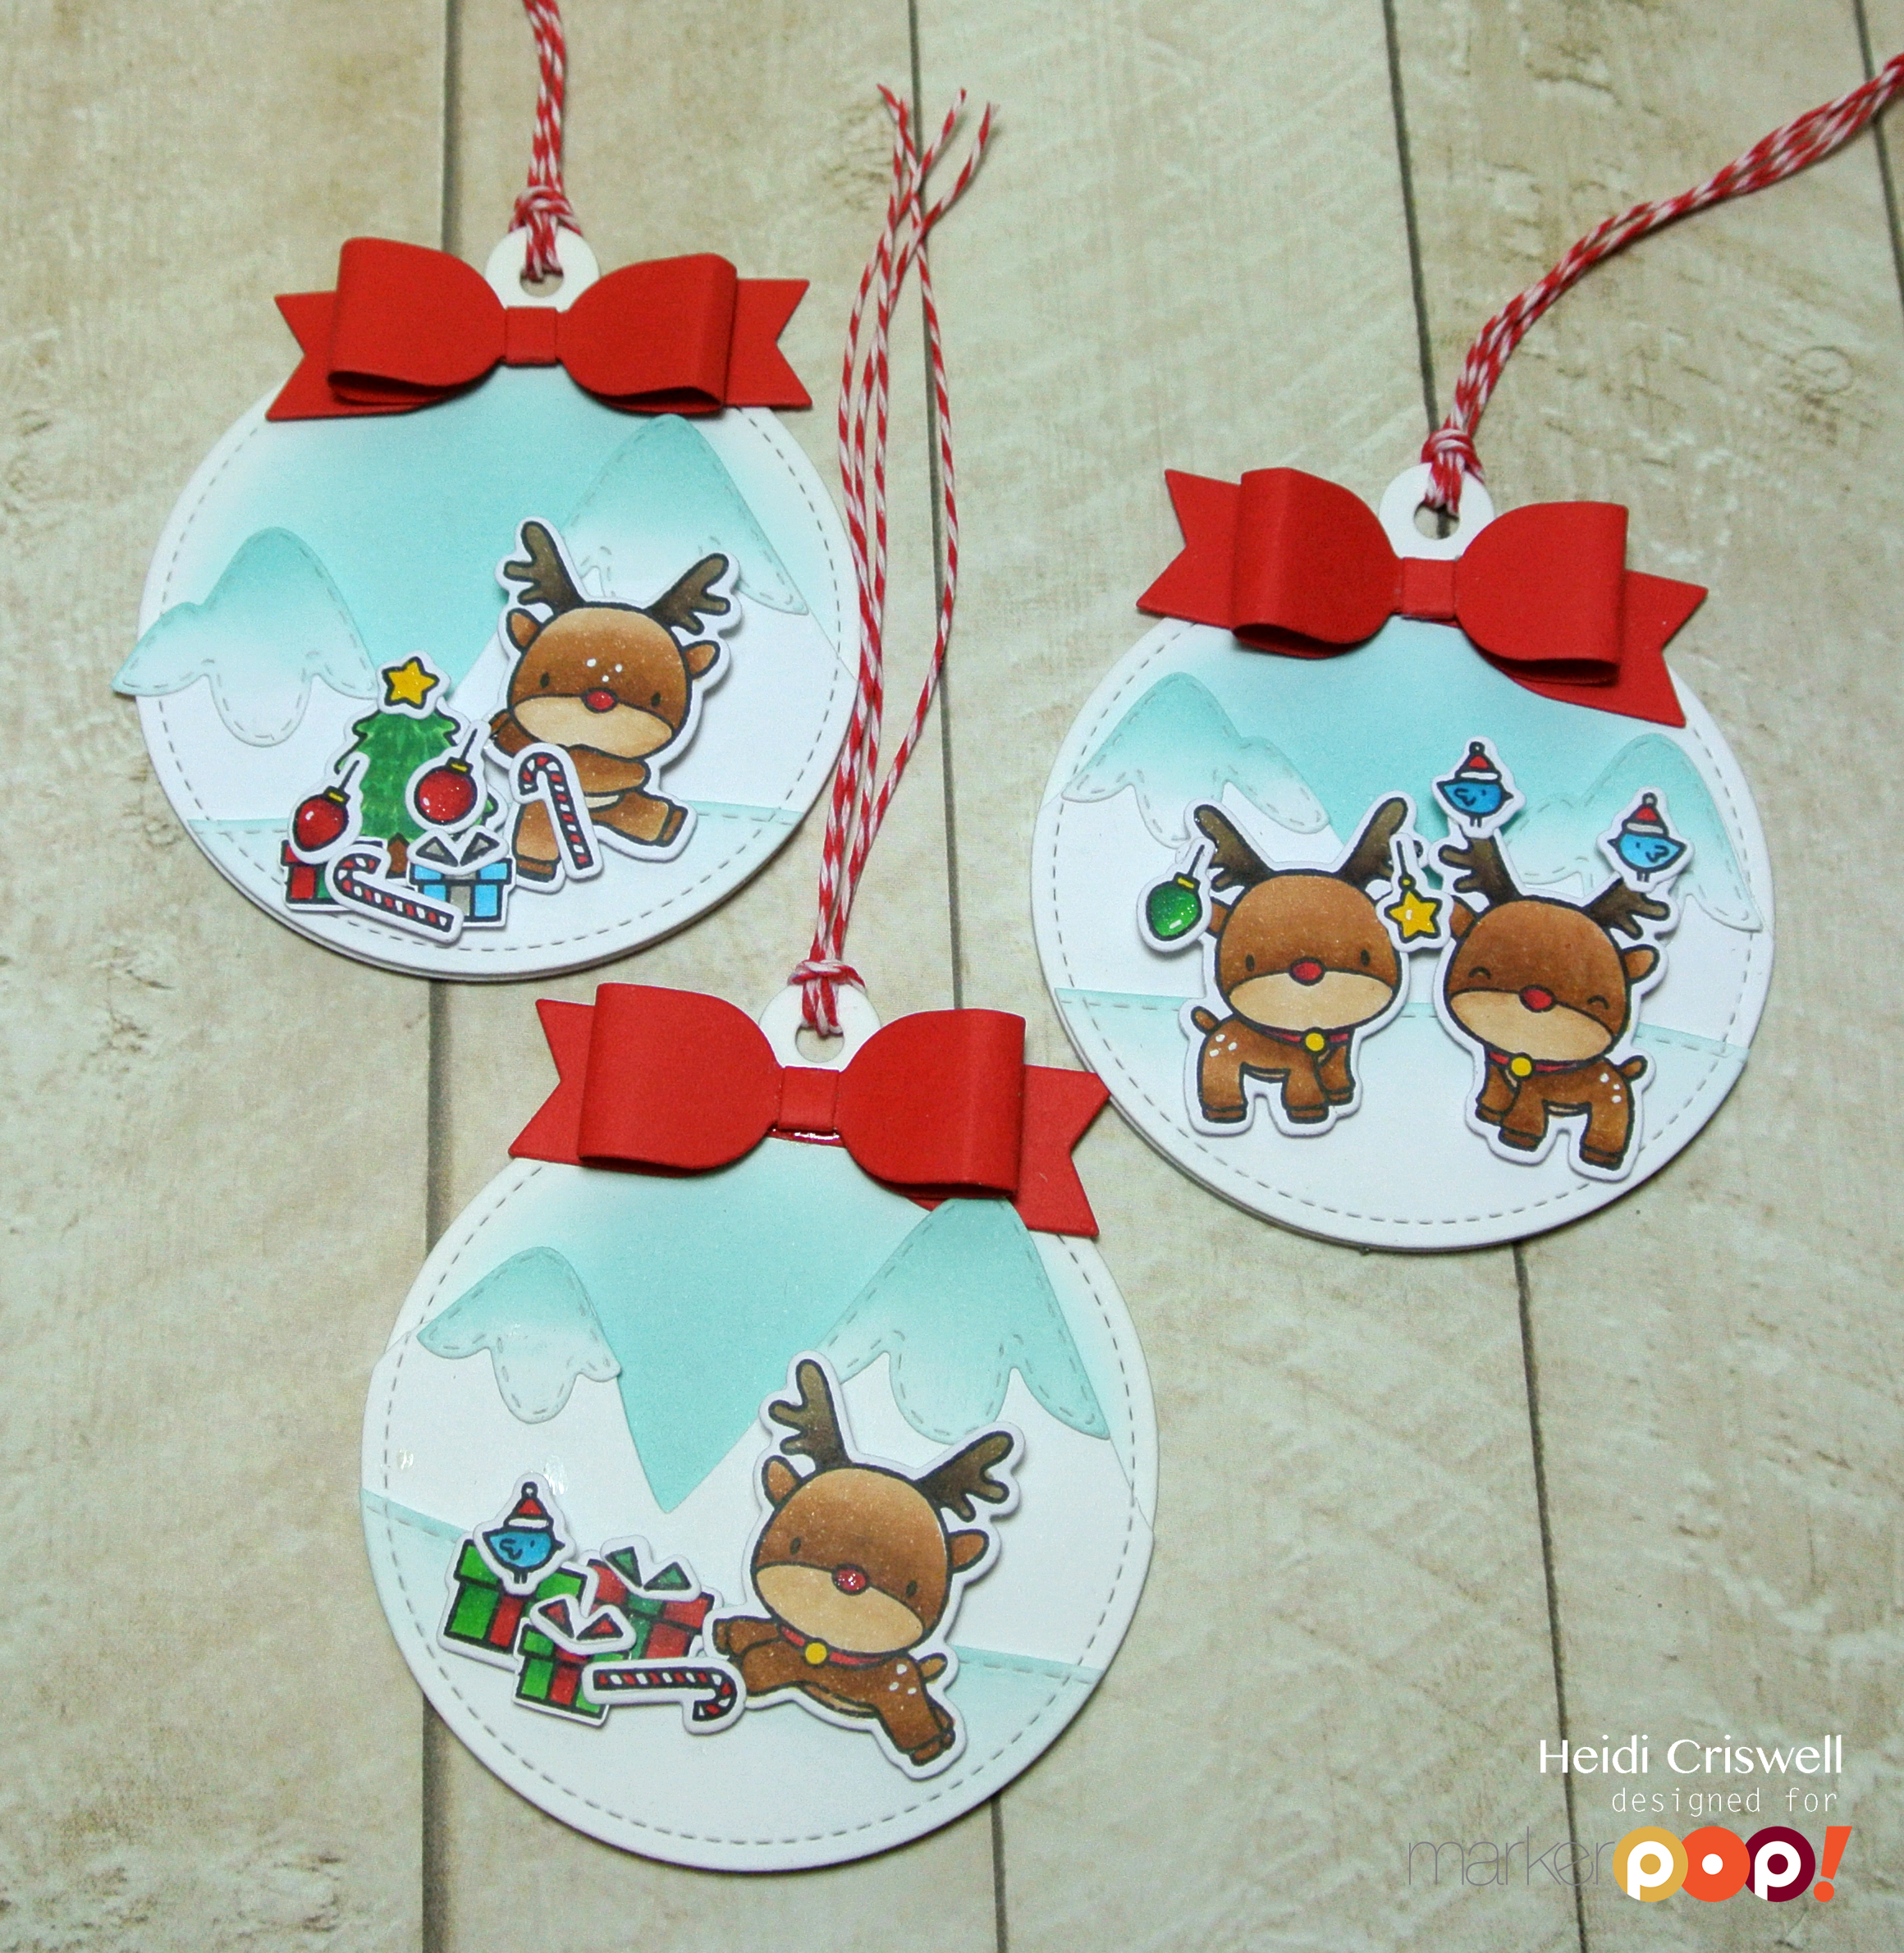
For this card I stamped the images on to Copic card stock, using Memento Tuxedo black ink and I colored them using Copic markers, then I die cut them using the Lawn cuts coordinated die. The tree is from the "Critters in the forest" stamp set, the deer and trio of presents are from the "Toboggan together" stamp set, and the little presents and the Christmas lights are from the "Baaah Humbug" stamp set.
20151201_231320
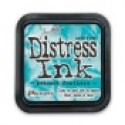
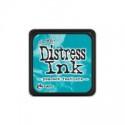
For the background I used Distress Inks, in "Broken China" and "Tumble Glass" . I placed the images on the card panel using foam adhesive, I cut a piece 5.5 x 4.25 of "Let's Bokeh in the Snow"patterned paper by Lawn Fawn, I adhered the card panel using foam adhesive, and I used some "Glossy accents" on the Christmas lights and some white liquid enamel as snow to add some dimension.  
I hope you enjoyed this card, and give these fabulous stamps and products a try.
Have a lovely day!

Thanks so much for stopping by, I'll see you soon with more Crafty Time 4U!

Tuesday, December 1, 2015

Bundle Up Tags Featuring Sunni Studio Stamps

Hello everybody, welcome back to Crafty Time 4U, I hope you are having a super nice day! This week at the Sunny Studio Stamps blog we are introducing the "Bundle Up" stamp and coordinated die set. I love this set is like playing with paper dolls and getting them dress up, you can customize the stamp images or even paper piece them. To showcase this adorable stamp set I made these Christmas tags, I hope you'll enjoy them


I inked some tags using distress inks and them I added the snow using s stencil and embossing paste. I stamped colored  the images using Copic Markers, then I die cut them, I dressed up the penguins using some liquid glue, then I place the bundle up penguins on the tags using foam adhesive.


To finish the tags I attached some bows made of ribbon and some little jingle bells with twine.

The "Bundle Up" stamp set is available at the Sunny Studio Stamp Shop.
We are enjoying seeing your creations using our stamps, keep them coming using the #SunnyStudioStamp
Have a lovely day!

Thanks so much for stopping by, I'll see you soon with more Crafty Time 4U!

Tuesday, November 24, 2015

Santa's Helpers at the Sunny Studio Stamps

Hello everybody, welcome back to Crafty Time 4u, today Im at the the Sunny Studio Stamps blog.  This week we are introducing the Santa's Helpers stamps and coordinated die set. This stamp set is perfect for all you cat and dog lovers out there. Here is my card that I created to share with you today.  I hope you'll enjoy it!


For this card I stamped and colored the images using Copic Markers.   I then created a brick background on a piece of red cardstock using a stencil.  I added a scalloped glittery green border and hung the stockings with the kittens on top using some festive colored bakers twine. 


I stamped the sentiment directly onto the card base along with a little paw print from the set. I also added some detail with a white gel pen on the stockings. 

The "Santa's helpers" stamp and die set are available at the Sunny Studio Stamp shop.  We can't wait to see what you create with them!   Have a lovely day!

Thanks so much for stopping by, I'll see you soon with more Crafty Time 4U!

Saturday, November 21, 2015

Have a Cozy Christmas Featuring Newton's Nook

Welcome back to Crafty Time 4U, I hope your week was great. Today I am at the Marker POP blog sharing some Christmas inspiration featuring Newton's Nook "Nap time" stamp and coordinated die set, I also use elements from other brands, which I will list blow, however the main focus of my card is Newton sleeping on the blankets on Christmas night. Let me show you the card and I will be telling you a little bit more about it

I blended a night sky background using Salty Ocean and chipped Sapphire Distress inks and I used and stencil to add some snow. Then I cut the window using the "Dienamics Blueprints No.20" and I also place some a stitched snow hill on the out side of the window. The lights hanging form the window are from the "Baa h Humbug" stamp and coordinated die by Lawn Fawn, and the silhouette of the Santa's sled and reindeer are from the "Ready set snow" stamp set.   

 I colored Newton and the blankets, and the the Christmas lights using Copic Markers and added some details with a white gel pen and glossy accents. I stamped the sentiment ditectly on the card panel from the "Cozy Christmas" stamp set by Lawn Fawn, and I adhered the card panel to the card base using foam adhesive. 

I hoped you enjoyed this card and that you got some inspiration for your Christmas and holiday projects.
Have a lovely day!

Thanks so much for stopping by, I'll see you soon with more Crafty Time 4U!


Monday, November 16, 2015

Lawnscaping Challenge No. 118, In With The Old


Hello everybody, welcome back to Crafty Time 4U, I hope you had a great weekend! We have a new Lawnscaping Challenge at Lawnscaping blog: Lanscaping Challeng No. 118 "In with the old" sponsored by Lawn Fawn
I created this card using the "Sweet Christmas" stamp set by Lawn Fawn, it is a set from few years ago, but still super cute! 

For this card, I stamped and colored all the images using Copic Markers and then I die cut them using the coordinated die. The striped paper I used on the side of the card is the little half and inc piece that comes on the 12x12 Lawn Fawn paper. I heat embossed the sentiment using white embossing powder and I assembled the card using foam adhesive.  I create the snow detail using the Marvi snow marker. 

I hoped you enjoyed this card and that you enter our current challenge.
Have a lovely day!

Thanks so much for stopping by, I'll see you soon with more Crafty Time 4U


Thursday, November 12, 2015

Holiday Card Featuring MFT Stamps

Hello everybody, welcome back to Crafty Time 4U! Yesterday I was at the Marker POP blog sharing with you some holiday inspiration using the “Santa’s Elves” stamp and coordinated die set by My Favorite Things. I love everything elf related and this adorable set is not the exception!
Let me show you the card and I will be telling you a little bit more about how I created this card
20151110_174530_001I cut a panel of white cardstock using the larger stitched rectangle by Lawn Fawn, then I cut the largest Dienamics stitched tag by My Favorite Things and I used the English Brick Wall stencil by My Favorite Things to created the background on the tag; I used “Peacock Feather Distress Ink” to ink the stenciled background.  
20151110_174630I die cut and stamped the images and then I colored them using Copic Markers, I heat embossed the sentiment on to black cardstock using white embossing powder, and I arranged the elements which I adhered to the card using foam and liquid adhesive.  To finish the card I added some gold ‘Stickles‘ to the trim of the tree, some Wink of Stella, and some Ranger glossy accents 
Copic Markers that I used: YG97, YG07, YG05, E00, E02, E13, R89, R27, R24, BG49, BG15, BG13, T02, T00, E27, E25, E57, W01, W03, W05,

Supplies:


Thanks so much for stopping by, I’ll see you soon with more colorful inspiration

Wednesday, November 11, 2015

Sunny Studio Stamps & Cardmaker Magazine Blog Hop


Hello everybody, welcome back to Crafty Time 4U, Today is a special day and you are invited to be inspired with the Sunny Studio Stamps and Cardmaker Magazine blog hop. We have special guests and a tone of inspiration for your holiday creations, so let's start it! 

For today's card I used the Sunny Studio Stamp set "Santa's helpers" you know I love dogs and cats and this set is so special to me because it has some adorable festive puppies and kittens, although I didn't use the puppies for my card you will see me using them soon! 

I used the "merry & bright script dies that come in the "Santa's helpers" coordinated die set to create the sentiment for this card. I stamped and colored the kittens using Copic Markers and added some details with a white gel pen, and I added glossy accents on the lights around the cream cat. 
What is a blog hop without prizes and perks? The Sunny Studio Stamp is giving away two stamp sets of the winner's choice, to two different lucky winners. So stop by the Sunny Studio Stamps blog and enter the Rafllecopter giveaway.
Also we have an awesome discount to the Sunny Studio Stamps Shop, use the code "CARDMAKER for 20% off your total purchase until 11/14/15 at noon PST

Your next stop is the Stacy Morgan's blog


Here's the whole line-up, in case you started here
Heidi Criswell you are HERE


Thanks so much for stopping by, I'll see you soon with more Crafty Time 4U


Monday, November 2, 2015

Marker POP challenge: Any Shape But A Rectangle

Hello everybody welcome back to Crafty Time 4U, crazy weekend over here if you ask me! But let's start the week with a new at the Marker POP blog, this time we are hosting a very exciting one, "Any Shape But A Rectangle" how fun is that? I have some inspiration for you using Mama Elephant stamps and dies.
I made this ornament-tags using the adorable "Reindeer games" stamp and die set by Mama Elephant, I used other elements that I'll list below. Let me show you and I will tell you all about it!

DSC_8242To cut the base of this round tag I used the large of the Lawn Fawn "Stitched Circle Tags" on white cardstock. Then I cut the Snow caped mountains by Mama Elephant and I inked the stitched tops. Then I cut a snow border using the Mama Elephant creative cuts "Landscape trio" to set the little deer. I inked the little snow border a little bit to give it some of dept. 

DSC_8253I stamped and colored all the images using Copic Marker, then I die cut them, using the "Reindeer games" Creative cuts coordinated dies. I set the scenes, and I adhered all the elements using foam adhesive and liquid glue. I also added some details to the deer using a white gel pen.
DSC_8222To finish the tags I die cut a the smallest bow out of red cardstock using a "Dienamics Beautiful Bows" by My Favorite Things," but you could used any bow you have handy or even ribbon. Then I thread some red and white bakers twine through the tag's holes. At this point, you can decide, if you want a tag, then stamp the words "to and from" in the back, or you could make an ornament out of it, by inserting the tag in the middle of one of those ornaments that come in two halves, these tags fit perfectly in the 70 mm. ornaments

I hope you got inspired to enter this challenge clic HERE, you'll have until the Friday November 13th to enter.

Thanks so much for stopping by, I'll see you soon with more Crafty Time 4U!


Wednesday, October 21, 2015

Have a Mice Christmas, Featuring Mama Elephat

Hello everybody welcome back to the Crafty Time 4U! Today I'm at the Marker POP blog with some holiday inspiration featuring "Festive Mice" stamp and die set by Mama Elephant, I also used the "Snow cape mountains" Creative cuts" also by Mama Elephant! I'm absolutely in love with the latest Mama Elephant release, and you will see more Mama Elephant inspiration from me, in the days to come. Let me show you the card that I made, and I will be telling you more about it.
 DSC_8135For the background I used a brick stencil from My Favorite Things and I randomly inked some spots using Fire Brick distress ink. I created the window using the My Favorite Things Blueprints No.20, and I used a snow stencil for the outside background with some embossing paste. For the sky background I used "Salty Ocean" and "Chipped Sapphire" distress inks. The cut the snow cape mountains from craft card stock and the snowy tips from white card stock.
DSC_8138I stamped and colored all the images using Copic Markers, some of them I die cut using the coordinated dies, and some others such as the lights I fussy cut. The two little presents are from the "Reindeer Games" stamp set also by Mama Elephant. I arranged and adhered all the elements using some foam adhesive and liquid glue, I used white gel pen to add some detail to the mouse's pajamas and the tree, some glossy accents on the lights, and some Wink of Stella on the presents.
I hope you enjoyed this card and that you would check out the adorable new Mama Elephant release at the Marker POP store  

Thanks so much for stopping by, I'll see you soon with more Crafty Time 4U!

Monday, September 28, 2015

Lawnscaping Challenge, One Layer Cards


Hello everybody, welcome back to Crafty Time 4U, I hope you had a great weekend! Today I'm over the Lawnscaping Challenge blog, we are currently having our Lawnscaping Challenge No. 114 "One Layer Cards", sponsored by Lawn Fawn. If you haven't enter it, you can do it HERE
To inspire you to participate, I had created couple of one layer cards, one for fall and one for Christmas. One layers cards are great for mailing, and also can be quickly made. So here are the cards that I made, I hope you'll enjoy them and enter this challenge, I can't wait to see all your creations

 For this card I sued the "into the woods" the leaves were from the "Happy harvest" and the banner from "bannerific" stamp sets by Lawn Fawn. I used a little bit of masking and I finished the card with some 4mm sequins. 

For this card I got inspired on a card that I made back in July, however it wasn't a one layer card nor a Christmas card, but the idea came from that card you can see the card here. For this card I used the "Baaah Humbug" stamp set, some masking, and some subtle ink blending. I used the stitched borders to emboss some decorative border along the left and bottom sides of the card, and finished with some sequins.

Masking is a great way to add dimensions to a one layer card. you can do a lot more complex masking, or you could make simple fast cards to send easily over the mail, the possibilities are endless. 

I hoped you enjoyed these cards and that you give them a try, have a wonderful week!

Thanks so much for stopping by, I'll see you soon with more Crafty Time 4U!