Showing posts with label Lawn Fawn. Show all posts

Wednesday, December 23, 2015

Lawnscaping Challenge FIT Blog Hop Inspired by the Color Evergreen


Welcome back to Crafty Time 4U, today is the last Lawnscaping Challenge FIT blog hop, and it is inspired by the color evergreen, and sponsored by the Ink Road online store. 
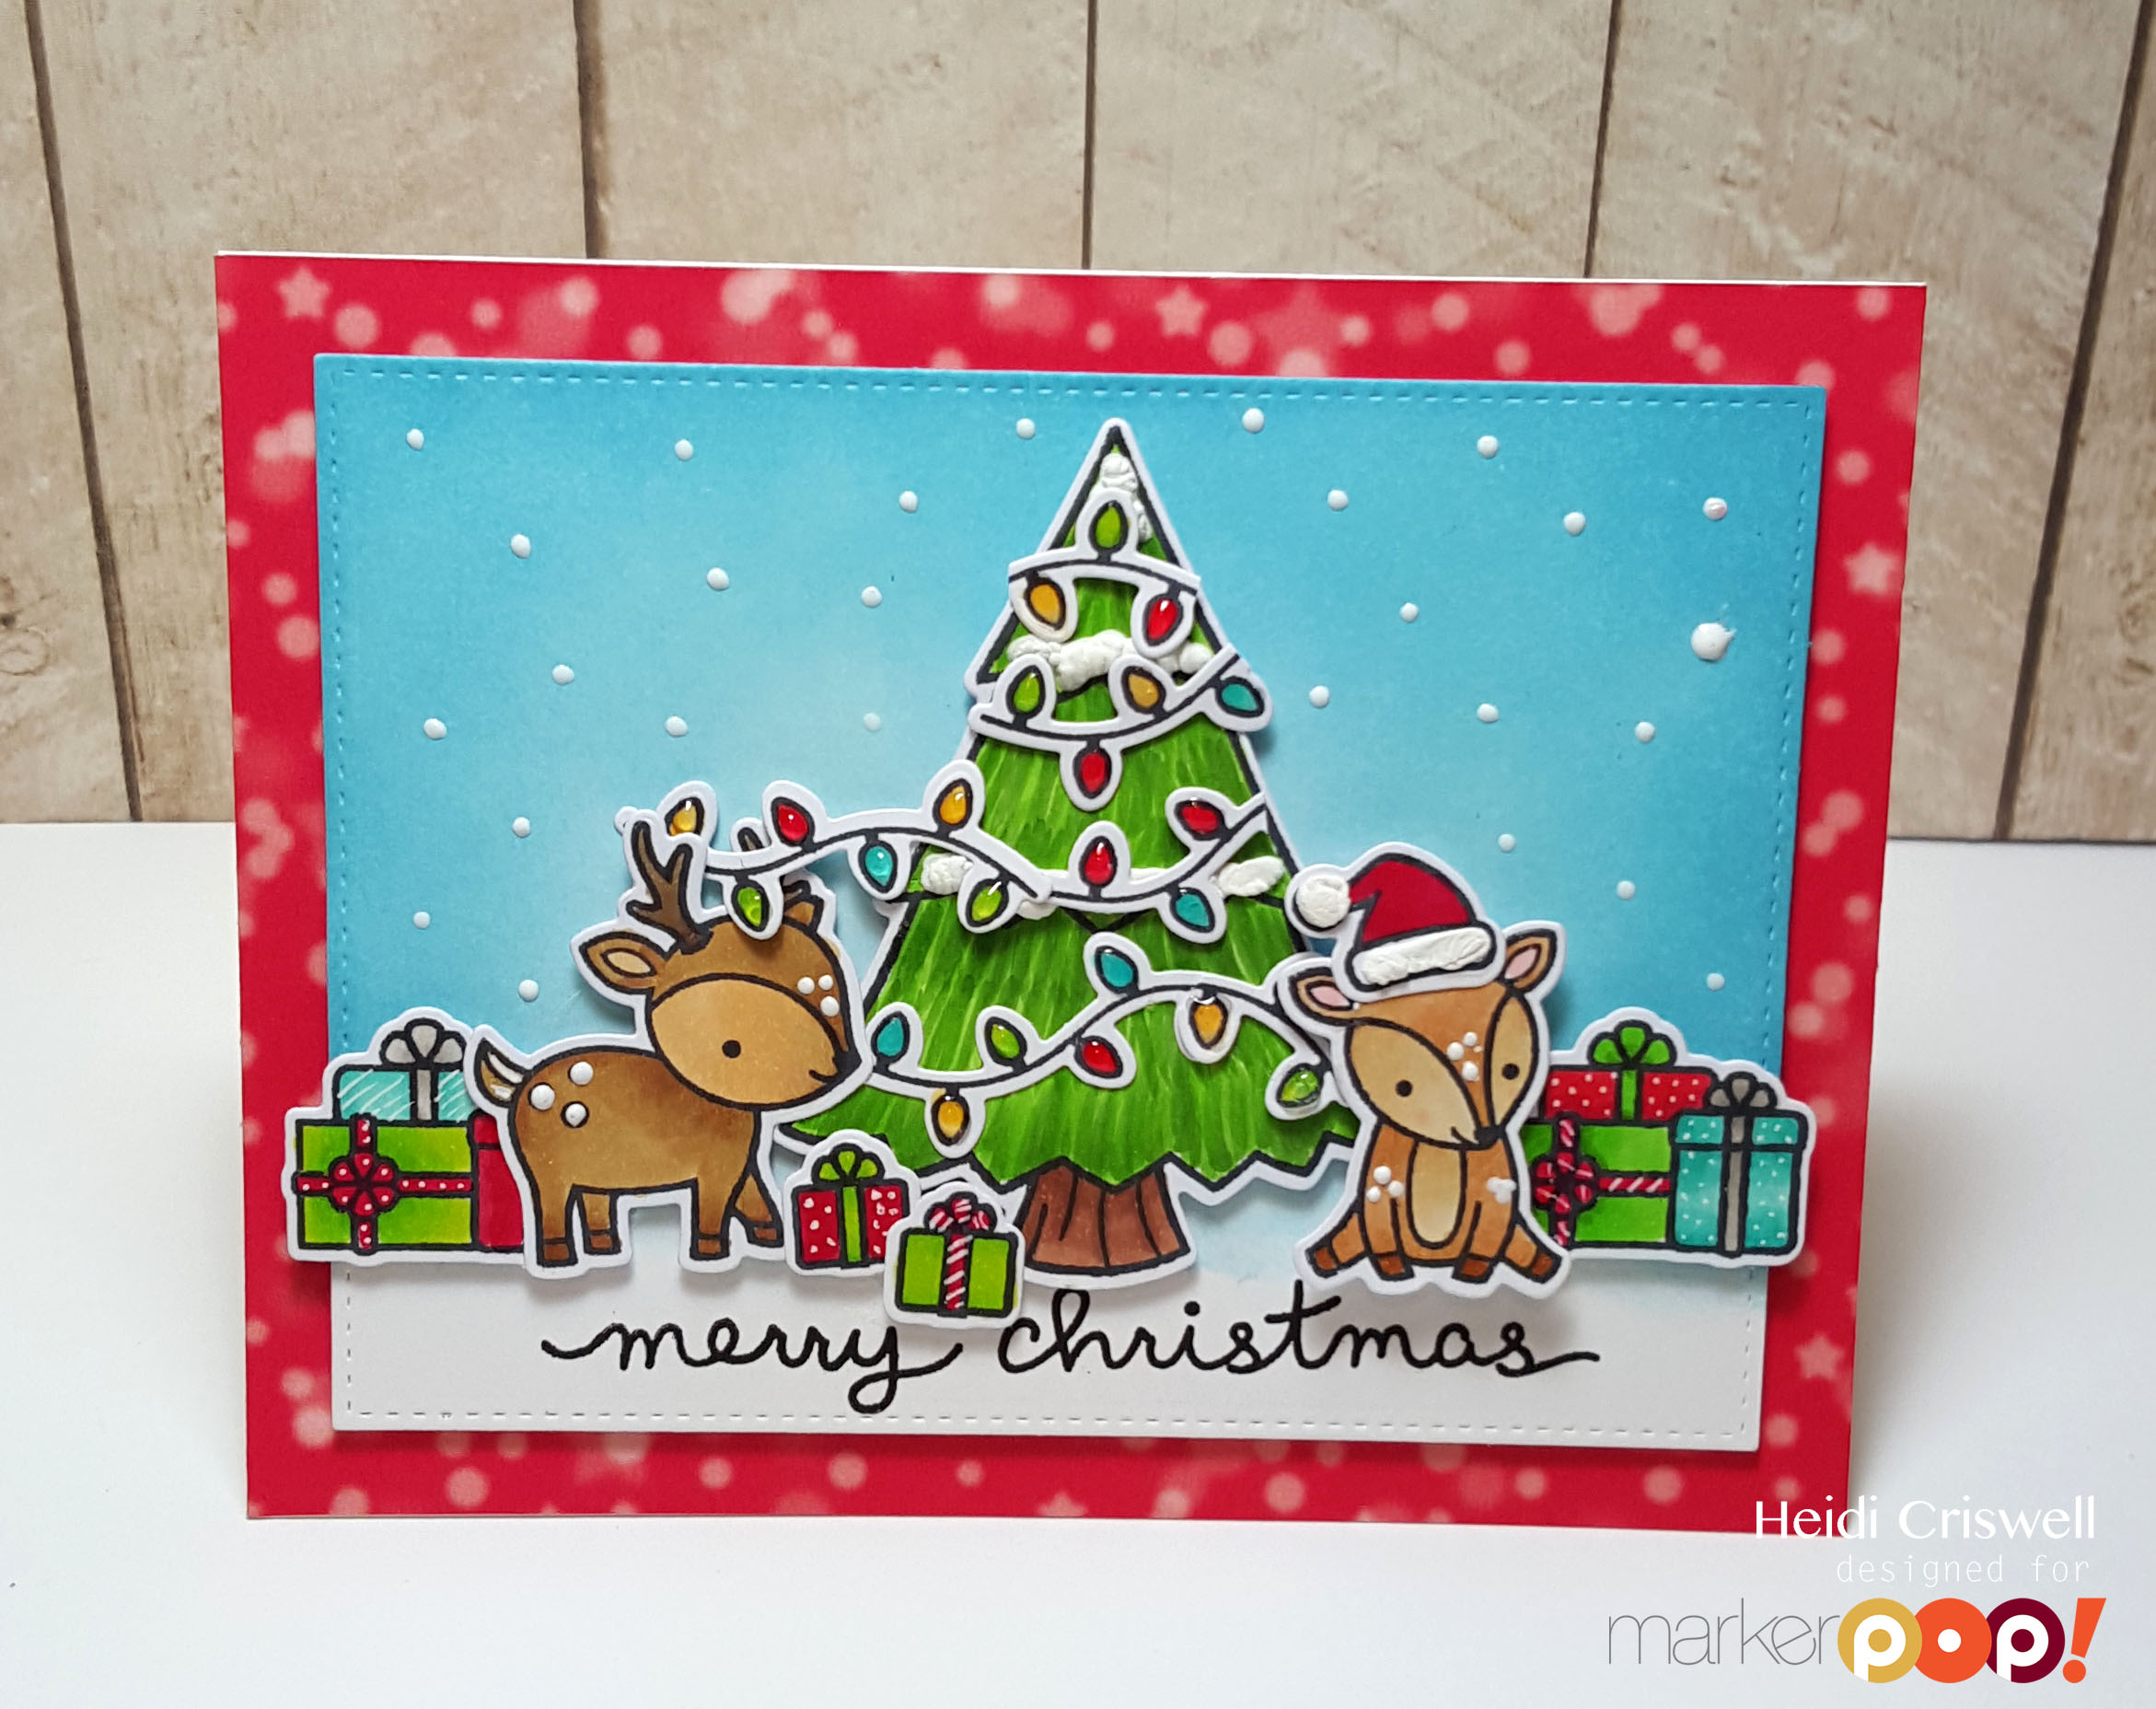
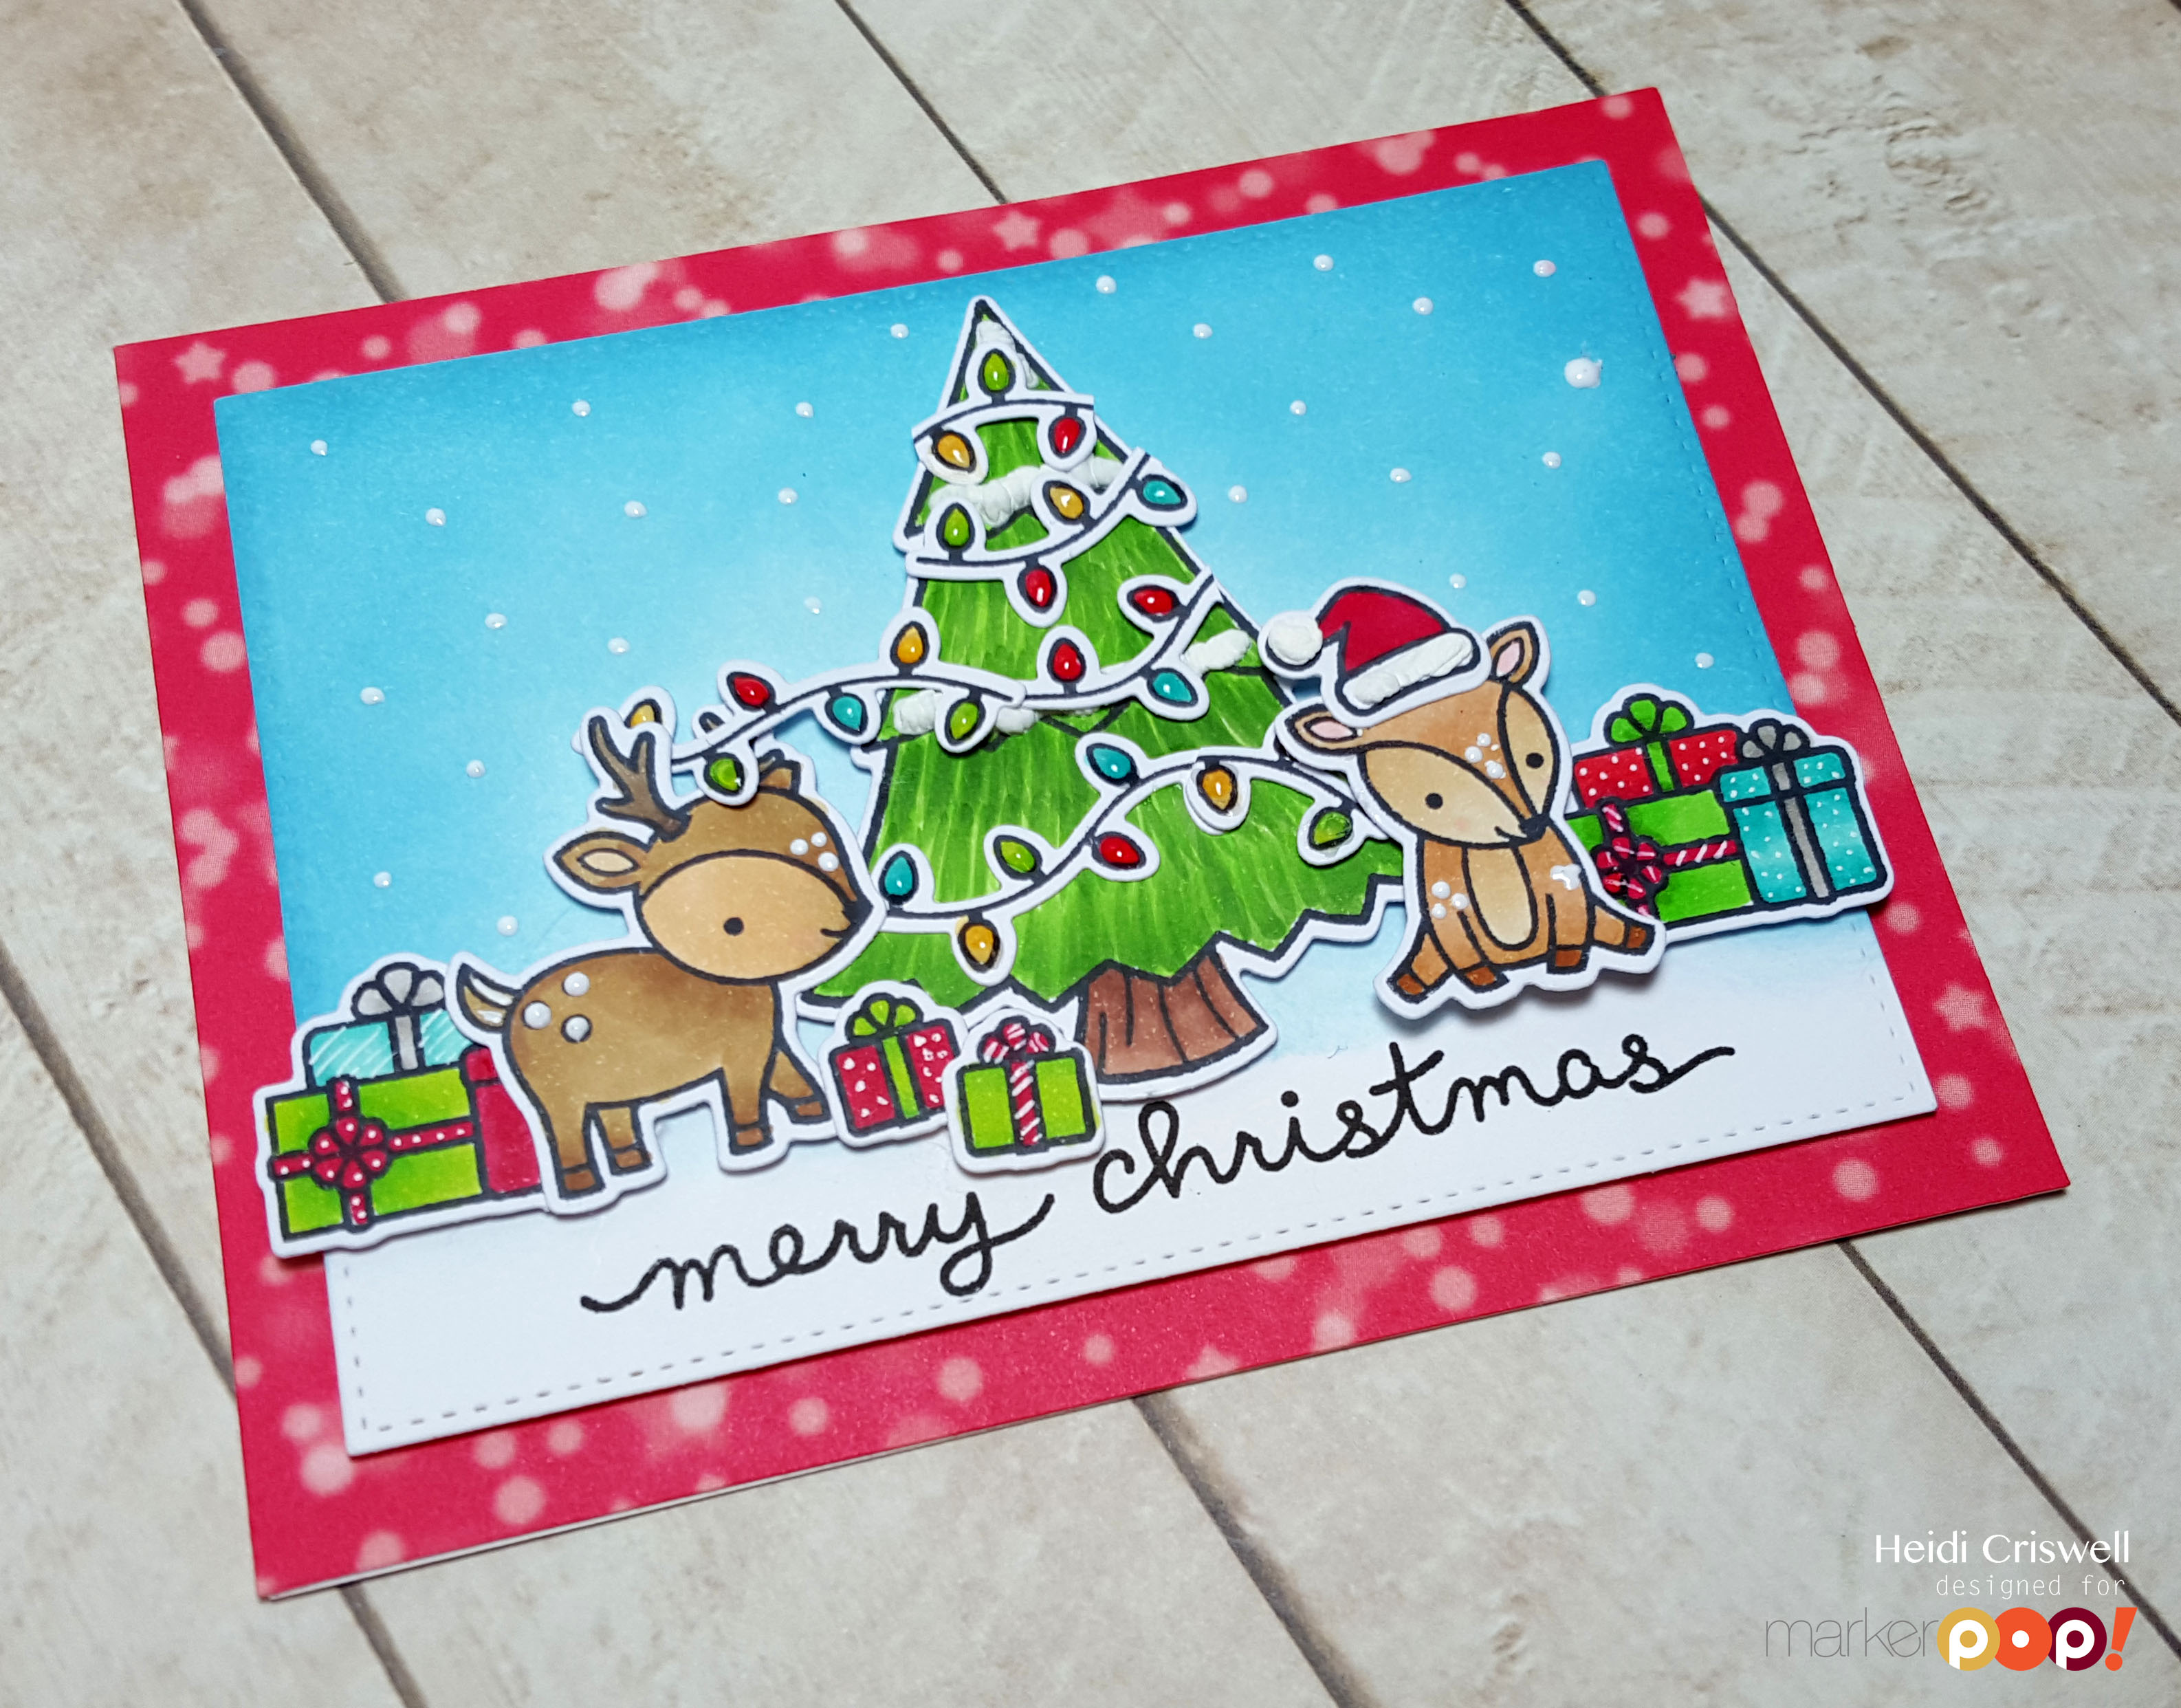
I created this quick card for this last blog hop, I hope you'll enjoy it 

for this card, I used the "Baaah Humbug" stamp set and I added some texture to the ship using a snow marker. I also used the "stitched party banners" and some Lawn trimmings in "green sparkle"

Here is the whole lineup of the blog hop, don't forget to leave your comments on each one of the participants blog for the chance to win a $25 gift card to the Ink Road online store

Lawnscaping blog
Lexa 
Lenny: 
Kate 
Kim:
Angel
Heidi (you are HERE) 

Thanks so much for stopping by, have a lovely day! 


Wednesday, December 2, 2015

Christmas Card Featuring Lawn Fawn

Hello everybody, welcome to Crafty Time 4U! Today I'm at the Marker POP blog sharing some Christmas cheer in a form of a card, using Lawn Fawn stamps, dies, and papers.
Let me show you the card and I'll tell you a little bit more about it

20151201_231255For this card I stamped the images on to Copic card stock, using Memento Tuxedo black ink and I colored them using Copic markers, then I die cut them using the Lawn cuts coordinated die. The tree is from the "Critters in the forest" stamp set, the deer and trio of presents are from the "Toboggan together" stamp set, and the little presents and the Christmas lights are from the "Baaah Humbug" stamp set.
20151201_231320For the background I used Distress Inks, in "Broken China" and "Tumble Glass" . I placed the images on the card panel using foam adhesive, I cut a piece 5.5 x 4.25 of "Let's Bokeh in the Snow"patterned paper by Lawn Fawn, I adhered the card panel using foam adhesive, and I used some "Glossy accents" on the Christmas lights and some white liquid enamel as snow to add some dimension.  
I hope you enjoyed this card, and give these fabulous stamps and products a try.
Have a lovely day!

Thanks so much for stopping by, I'll see you soon with more Crafty Time 4U!

Monday, November 23, 2015

Give Thanks Card at the Lawnscaping Blog

Happy Monday,welcome back to Crafty Time 4U, I hope you had a great weekend. Today I'm at the Lawnscaping Challenge blog sharing with you a very simple Thanksgiving card to put you on the Thanksgiving mood this week. I know lots of us are really busy with Thanksgiving preparations and other holiday related tasks, so I thought you might appreciated a quick card, let me show you the card and will tell you a little bit more about it.

For this card, I used the "Thankful Mice" mini stamp set by Lawn Fawn the "Thanks scripty die" and the "Polaroid Lawn cuts" by Lawn Fawn. I applied a soft shading on the card panel through a stencil, I also apply some soft shading to the Polaroid frame. 
  
 I colored the little mice using Copic Markers, and I used some orange dotted paper from the "Let's Polka in the Dark petite pad," I adhered all the elements to the card using foam and liquid adhesive. 

I hope you enjoyed this card, I wish you a lovely and happy Thanksgiving! 


Saturday, November 21, 2015

Have a Cozy Christmas Featuring Newton's Nook

Welcome back to Crafty Time 4U, I hope your week was great. Today I am at the Marker POP blog sharing some Christmas inspiration featuring Newton's Nook "Nap time" stamp and coordinated die set, I also use elements from other brands, which I will list blow, however the main focus of my card is Newton sleeping on the blankets on Christmas night. Let me show you the card and I will be telling you a little bit more about it

I blended a night sky background using Salty Ocean and chipped Sapphire Distress inks and I used and stencil to add some snow. Then I cut the window using the "Dienamics Blueprints No.20" and I also place some a stitched snow hill on the out side of the window. The lights hanging form the window are from the "Baa h Humbug" stamp and coordinated die by Lawn Fawn, and the silhouette of the Santa's sled and reindeer are from the "Ready set snow" stamp set.   

 I colored Newton and the blankets, and the the Christmas lights using Copic Markers and added some details with a white gel pen and glossy accents. I stamped the sentiment ditectly on the card panel from the "Cozy Christmas" stamp set by Lawn Fawn, and I adhered the card panel to the card base using foam adhesive. 

I hoped you enjoyed this card and that you got some inspiration for your Christmas and holiday projects.
Have a lovely day!

Thanks so much for stopping by, I'll see you soon with more Crafty Time 4U!


Monday, November 16, 2015

Lawnscaping Challenge No. 118, In With The Old


Hello everybody, welcome back to Crafty Time 4U, I hope you had a great weekend! We have a new Lawnscaping Challenge at Lawnscaping blog: Lanscaping Challeng No. 118 "In with the old" sponsored by Lawn Fawn
I created this card using the "Sweet Christmas" stamp set by Lawn Fawn, it is a set from few years ago, but still super cute! 

For this card, I stamped and colored all the images using Copic Markers and then I die cut them using the coordinated die. The striped paper I used on the side of the card is the little half and inc piece that comes on the 12x12 Lawn Fawn paper. I heat embossed the sentiment using white embossing powder and I assembled the card using foam adhesive.  I create the snow detail using the Marvi snow marker. 

I hoped you enjoyed this card and that you enter our current challenge.
Have a lovely day!

Thanks so much for stopping by, I'll see you soon with more Crafty Time 4U


Tuesday, November 10, 2015

Stamping Smiles Design Tic-Tac-Toe Challenge


Hello everybody, Welcome back to Crafty Time 4U, Today i am sharing with you an easy project that I created to entered the Design team call for the Stamping Smiles Design "Tic-Tac-Toe Challenge" I read all about this challenge and I am so excited about it, I love the whole idea behind it and I the endless possibilities that I can created with.
I hope you'll like what I had created for you

 I cut the pillow boxes from some craft wood grain embossed card stock, (by Ellen Hutson) then I used the Lawncuts stitched leaves to cut some leaves from white card stock and gold foil paper, I color the leaves using Distress Inks and a blending tool. I also sponge the pillow boxes with a little "Tea Dye Distress Ink." to give them some more texture. 
 
I wrapped some "Gold Sparkle Lawn Trimmings" twine by Lawn Fawn and I cut a a little banner to stamp the sentiment. I used the "I'm so thankful" sentiment from the "Happy Feast" stamp set and I adhered the banner and the leaves on top the twine using permanent big glue dots.

Very simple project for the Thanksgiving table or for a small Thanksgiving gift, I love all the possibilities this challenge brings you. I used the bottom three elements of the "tic-tac-toe board: twine, craft, and wood grain but I also incorporated some sparkle and leaves. 
You can enter this Design Team Call by clicking HERE   There are only two more days to enter, so hurry, I am sure it will be fun!

Thanks so much for stopping by, I'll see you soon with more Crafty Time 4U!

Friday, November 6, 2015

Lawnscaping Challenge No. 117 Thinking of You


Hello dear crafty friends, welcome back to Crafty Time 4U! This week at the Lawnscaping blog we have a new challenge, the Lawnscaping Challenge No. 117 "Thinking of you" sponsored by Ellen Hutson, and to inspired you to enter this challenge I created this card that I hope you'll like

 I created a night background by blending some Chipped Sapphire and Broken China Distress ink, then I splattered with some "unicorn white" ink. I colored and die cut the images from the "Toboggan Together" stamp set and I also used the bubble from "A birdie told me " and the ice from "Critters from the Arctic" stamp sets by Lawn Fawn.   

I stamped and heated embossed the sentiment from a combination of "Scripty sayings" (thinking about you) and the "Toboggan together" (deer friend) stamp sets.

I hope you enjoyed this card, and that you enter our current Lawnscaping Challenge, you can enter by clicking HERE
I wish you a lovely weekend!

Thanks so much for stopping by, I'll see you soon with more Crafty Time 4U!  


Monday, November 2, 2015

Marker POP challenge: Any Shape But A Rectangle

Hello everybody welcome back to Crafty Time 4U, crazy weekend over here if you ask me! But let's start the week with a new at the Marker POP blog, this time we are hosting a very exciting one, "Any Shape But A Rectangle" how fun is that? I have some inspiration for you using Mama Elephant stamps and dies.
I made this ornament-tags using the adorable "Reindeer games" stamp and die set by Mama Elephant, I used other elements that I'll list below. Let me show you and I will tell you all about it!

DSC_8242To cut the base of this round tag I used the large of the Lawn Fawn "Stitched Circle Tags" on white cardstock. Then I cut the Snow caped mountains by Mama Elephant and I inked the stitched tops. Then I cut a snow border using the Mama Elephant creative cuts "Landscape trio" to set the little deer. I inked the little snow border a little bit to give it some of dept. 

DSC_8253I stamped and colored all the images using Copic Marker, then I die cut them, using the "Reindeer games" Creative cuts coordinated dies. I set the scenes, and I adhered all the elements using foam adhesive and liquid glue. I also added some details to the deer using a white gel pen.
DSC_8222To finish the tags I die cut a the smallest bow out of red cardstock using a "Dienamics Beautiful Bows" by My Favorite Things," but you could used any bow you have handy or even ribbon. Then I thread some red and white bakers twine through the tag's holes. At this point, you can decide, if you want a tag, then stamp the words "to and from" in the back, or you could make an ornament out of it, by inserting the tag in the middle of one of those ornaments that come in two halves, these tags fit perfectly in the 70 mm. ornaments

I hope you got inspired to enter this challenge clic HERE, you'll have until the Friday November 13th to enter.

Thanks so much for stopping by, I'll see you soon with more Crafty Time 4U!


Friday, October 30, 2015

Lawnscaping Challenge FIT Blog Hop Inspired by the Color Orange


Hello everybody, welcome back to Crafty Time 4U, I hope you had a great week and that you are getting ready for a weekend full of crafty and Halloween fun, if you celebrate Halloween, if you don't crafting sounds good! Today the Lawnscaping Challenge FIT are having our monthly blog hop, sponsored by Ink Road online store. This month we are  inspired by the color orange.
I hope you'll like the card that I made for you today and that you hop along with us to see the rest of the lovely projects the Lawnscaping Challenge Facebook Inspiration Team have for you! By hopping with us today you have the chance to win a $25 gift card from our sponsor Ink Road online shop, just leave a comment along each of the participant blogs and you be entered.

For this card I used the "Happy Harvest" (wagon, crows, and pumpkins) and the "Thankful Mice" stamp and die sets by Lawn Fawn. I also used the largest of the "small stitched rectangles" and the second largest of the " Large stitched oval" die sets also by Lawn Fawn.

I also use paper from the 12x12 "Let's polka in the dark" collection by Lawn Fawn. I stamped and colored all the images with Copic Markers and I did pop them up with foam adhesive over the stitched oval, which I lightly shaded with distress inks. I adhered my panel directly over an orange card base. 

I hope you enjoyed this card and that you have fun and get inspired with this blog hop. 
You should have come from Jess blog and this is your last stop, below is the whole line up in case you started here, have a lovely weekend!

Kate

Thanks so much for stopping by I'll see you soon with more Crafty Time 4U!

Monday, October 26, 2015

Quick Halloween Cards Featuring Lawn Fawn


Hello everybody! welcome back to Crafty Time 4U, I hope you had a fantastic weekend full of crafting fun! Today I am sharing with you some quick Halloween inspiration at the Lawnscaping Challenge blog. Halloween is around the corner, so I decide to come out with something that would be quick and easy to do, so if you don't have time or need some last minute cards, this inspiration is for you. Also if you haven't enter our current Lawnscaping Challenge, "Too Cute to Spook" sponsored by Lawn Fawn, you can do so HERE

I cut some 4 7/8 by 3 1/2 note cards out some white cardstock and I added a piece of Lawn Fawn "Let's Polka in the dark" petite patterned paper to cover the whole front of the note card. Then I used the small "stitched party banners" die to cut a banner out of white cardstock. I created a pattern by stamping some of the little images from the "Spooktacular" and "critters in costume" stamp sets. I colored the little patterns using Copic Markers.


I stamped and diecut the cat, and the bunny in the pumpkin from critters in costume, and the bat from "Spooktacular" along with couple more bats from the "trick or treat" mini set, and I poped them with foam adhesive. Then I stamp and embossed the sentiments, and finally added some twine to the top of the banner and I tied a bow. 

I hope you enjoyed these cards and that you enter our current challenge: Too cute to spook! 
Have a wonderful week!

Thanks so much for stopping by, I'll see you soon with more Crafty Time 4U!


Monday, October 19, 2015

Lawnscaping Challenge No. 116 Too Cute to Spooke


Hello everybody! Welcome back to Crafty Time 4U! I hope you had a nice weekend!
Today we have a new Lawnscaping Challenge, and the theme is, "too cute to spook" sponsored by Lawn Fawn, so get your Halloween sets out or use some non-Halloween sets to create some spooky and sweet cards or other crafty projects and upload them to the Lawnsacapin challenge blog
To inspired you to enter the challenge I had created this card that I hope you'll like

 I created the background using Dusty Concord distress ink and the: "smooshing" background technique and I splattered some Black Soot distress ink. This is actually my second background because for some reason I smudged the black splatters in the first one and I almost did that on this one as well, even though I used my heat tool to dry them up. I had not idea what was happening because this is not the first time I use splatters of black. 

The Jack O' Lantern was actually an after thought as well since I thought the card need it a pop of a brighter color. The kitten, the hat, as well as the Jack O' Lantern
 are from the "Spooktacular"stamp set by Lawn Fawn

I hoped you enjoyed this card and that you got inspired to enter the challenge. Have a lovely week! 

Thanks so much for stopping by, I'll see you soon with more Crafty Time 4U!


Monday, October 12, 2015

Halloween Goody Bags Featuring Lawn Fawn

Hello everybody, welcome back to Crafty Time 4U! I hoped you had a super nice weekend! Last Saturday I was at the Marker POP blog sharing with you some these Halloween inspiration using some Lawn Fawn stamps and dies! These goodie bags are sure to delight kids or even grownups, fill them up with your favorite candy and hand out some Halloween joy!
I created individual scenes on each goody bag, let me show you and I will tell you a little more about them.

For this goodie bags I used multiple Halloween and some non-Halloween Lawn Fawn products. I cut the goodie bags from cardstock and I used some of the little stars from the “spooktacular” stamp set to heat emboss a starry sky. Then I stamped and die cut some images from the “trick or treat,” “hoppy Halloween,” “Critters in costume” and “spooktacular,” and arranged the scenes on the front panel of the goodie bags.
 DSC_8066 DSC_8065
DSC_8063I cut the clouds from cardstock, using the clouds from the "spring showers" stand along die by Lawn Fawn and I also created a hill from cardstock using "twisted citron" and "crushed olive" Distress inks. The "happy halloween" sentiment that I used is from "hats off you" stamp set and I heat embossed with white embossing powder and attache to the goodie bag using coordinated tiny clothe's pins. 

I hope you really enjoyed these goodie bags and that you got inspired to create fun gifts for your family and friends this Halloween.

Supplies:
Thanks so much for stopping by, I'll see you soon with more Crafty Time 4U!