Pages

Friday, November 28, 2014

Holiday Craft Series Day 9


Hey there! welcome to day nine of my holiday craft series. I hope you had a great Thanksgiving, and if you any shopping, I hope you have a safe shopping day! I am more of an online shopping, I believe there are bigger deals online. Maybe I'm wrong, but I'm not shopping this year anyway  because I'll be on a mini vacation trying to accomplish one of my dreams. I will tell you all about it, when I get back.
For now let's look at the card for day nine:
I created a very simple winter scene, that I hope you'll like:


Supplies:
Deck the halls stamp set, bannerific stamp set and coordinated dies, winter in the park stamp set, stitched hillside borders dies, 6x6 snow day paper pad, all by Lawn Fawn.
White cardstock, red cardbase, black pigment ink, green, yellow, and red dye ink, silver embossing powder, Versamark ink, stamp adhesive, foam adhesive.

Note: The winners of my giveaway be up on Monday, yay!

Thanks so much for stopping by! 

Wednesday, November 26, 2014

Holiday Craft Series Day 8

Welcome to day 8 of my holiday craft series! for today I have some cute little goodie bags that I want to share with you. How fun is to make this goodie baggies with the Lawn Fawn goodie bag die! I love it, I ordered it a while back and just got to try it ans I love it. And there is not right or wrong with it, you can decorate these goodie bags however way you like it.
I want to remind everyone that today is the last day to enter the giveaway for one of the two Lawn Fawn mini-sets. Like Crafty Time4U on Facebook and/or follow me on Pinterest and leave a comment telling me, that you did, on any post of this blog for your chance to win!
Now here are the goodie bags that I created for day 8 of my holiday craft series I hope you'll like them!


Supplies:
Gooddie bag Lawn cuts die, Snow day 6x6 and 12x12 paper collection, snow day stamp set, winter sparrows stamp set and its coordinated die, making frosty friends stamp set, deck the halls stamp set, all by Lawn Fawn.
Other Supplies:
red, aqua, craft cardstock, liquid adhesive, foam adhesive, Copic friendly cardstock, Memento tuxedo black, and various Copic markers.

Thanks so much for stopping by!

Tuesday, November 25, 2014

Holiday Craft Series Day 7 Gift Tags

Hey there! welcome to day 7 of my Holiday Craft Series.
It is that time of the year when we have to think of gift giving, so I had created a set of tags to help me with that!
Lets just dig into them, but not before I reminding you, that there is still time to enter my giveaway, you can leave a comment on any post of my blog, until Nov. 27 11:59 p.m.


Supplies:
Winter Penguin stamp set and its coordinating die, Winter Bunny stamp set and its coordinating die, Critters in the Snow stamp set, Birthday Tags stamp set, Tag You're It Lawn Cuts die, Stitched Hillside Borders, 6x6 snow day paper pad, all by Lawn Fawn.
Other Supplies: Copic friendly white cardstock, various Copic markers, embossing paste, falling snow stencil by SSS, foam adhesive, ribbon.

Thanks so much for stopping by!

Monday, November 24, 2014

Holiday Craft Series Day 6


Welcome to day six of my Holiday Craft Series! For today I have a fun card that I created a while ago, while I was just playing with a new stamp set from Lawn Fawn called "Deck the Halls." This stamp really got me in love, because of the amount of possibilities, I am a lover of pine trees and a sucker for everything Christmas related, so that's how this stamp set got to top my wish list for the holiday 2014. I have done several cards with this stamp set, and you'll see them all throughout the series, or by follow me on Flickr, because I preview all my work at Flickr first.
Don't forget that you'll still have time to enter my giveaway for one of the two Lawn Fawn mini sets. Follow me on Pinterest or follow Crafty Time 4U on Facebook and leave me a comment on any the blog posts until Nov. 27th 11 p.m.

Supplies:

Deck the Halls, Spooktacular, hats off you, Cozy Christmas, A birdie told me stamp sets
Lawn trimmings twine, A birdie told me lawncuts, all by Lawn Fawn
Other supplies: red cardstock, various Copic markers, Copic friendly cardstock, two different shades of green dye ink,  brown, black and red ink. foam adhesive, stamp adhesive.


Thanks so much for stopping by!


Friday, November 21, 2014

Holiday Craft Series Day 5 and Giveaway


Hey there, Heidi here on my birthday, to bring you day five of my holiday craft series. I have a photo tutorial and a pattern for you to make these K cups holders mini gifts. I made several of these to give to my son's school staff. I used to work at his school and during the winter we love this k cups to make us hot chocolate, coffee, or chai tea. So let's just dig on these right away.
I got this idea form the "Paper Craft Magazine" Holiday Cards & more V.6 pg 115, However, I traced a new pattern so I could make some changes that I wanted and here you can download my Kcup version which, it has the measurements, and where to cut and fold, but is not meant to be print on your project, you're not going to need that. It's very simple and quick, I promise.

I used partial die cutting with the Lawn Fawn goodie bag, make sure and turn your paper over so the nice stitching is on the front of the k cup holder.
Stamp and decorate to your taste.

And enjoy!
Now for the giveaway yay!
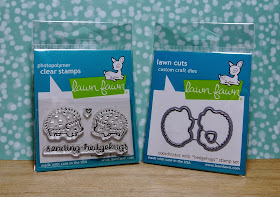
I have two sets of mini stamp and coordinated die to giveaway, one each, to two winners. All you have to do is follow Crafty Time 4U on Facebook OR follow me or any of my boards (that interest you) on Pinterest; then leave a comment telling me that you did it, and which stamp and coordinated die set are you interested on winning. You'll have until Nov. 27th at 11:59 p.m.
Here are the two sets I have for give away"
Hedgehugs love
Get well soon

Supplies:
"Love you a latte" stamp set and coordinated die, "Goodie bag" die, "Lawn trimmings", all by Lawn Fawn.
White, craft, and red cardstock, distress ink and blending tool, various "Copic markers", "Copic" friendly cardstock, "Memento Tuxedo black" ink, foam adhesive, liquid adhesive, scissors, scoring board, and bone folder.   

Thanks so much for stopping by!

Monday, November 17, 2014

Holiday Craft Series Day 4 Lawnscaping Challenge No. 94 Count Me In!


Hey there! Heidi here after a super busy week, but very excited to bring you my second post as guest designer for Lawnscaping Challenge's blog
I am so thankful for the great opportunity to showcase my work by the side of some awesome ladies, to who I admire so much. 
There are lots of new and exciting things coming soon to my crafting life. For now I can tell you, that I will continue bringing you the Holiday Craft Series and I will definitely try to enter the reminding Lawnscaping challenges of the year, as I usually do. 
Stay tune, because for my birthday (Nov. 21st) I will have a couple of small giveaways, but you'll love them! 
This Lawnscaping challenge is Count Me in! sponsored by the fabulous Lawn Fawn and it's about using numbers in your project. Here is my take on it I hope you like it. All the supplies are listed bellow.


Supplies:
"Spooktakular,"  "Hats off you," and "Claire's ABC's" stamp sets, 
Louie's 123's, "Small Stitched rectangles" and  the circle from the "Stitches party banners" dies
Patterned paper from the 12x12 Snow day collection
All by Lawn Fawn
Other supplies:
various Copic markers, white card base, Copic friendly cardstock, Memento Tuxedo black ink, Versafine Onyx black ink, stamp adhesive, foam adhesive. 
Note: the cats had been colored like my cat! (sort of) lol!

Thanks for stopping by, your kind comments make my day happier! 


Tuesday, November 11, 2014

Holiday Craft Series Day 3 one layer cards

Hey Heidi here with another Holiday Craft Series! I had changed the URL of my blog in order to unify all my social media sites with my blog, so now they are all called "Crafty Time 4U" except for my Twitter, but I will work on that soon.
I have couple of cards to share with you today, if you follow me on Flickr you probably had seen them before, because I post all my cards there until I have my post with the supplies ready.
Very simple cards no masking or layering involved. Stamp and color over white cardstock and, as soon that is done you can cut your panel with the stitched stack-able rectangles by Lawn Fawn, and pop it up or adhere it flat over your card base.


Supplies:
Stamps: Cozy Christmas, winter sparrows, deck the halls, and snow day, all by Lawn Fawn
Snow day collection paper. 
Various Copic markers, white Copic friendly cardstock, Memento Tuxedo black, red and white cardstock for card bases. 

Thanks for stopping by, your kind comments make my day happy!

Thursday, November 6, 2014

Fall Card: sweet as pie

Hey, Heidi here with a fall post. I'm currently posting for my "holiday Craft Series" on Mondays, Wednesday, and Fridays, except for this very last Monday when I have the Lawnscaping Challenge guest designer post. So between my holiday series I will post my fall and Thanksgiving cards and projects, so lots of things going on for November.
I wanted to share this card with you, it's really simple to make. I hope you'll like it!


Supplies:
"Happy feast" stamp set, the plate is from "love you a latte" stamp set.
wood grain paper is from the 12x12 into the woods collection
the yellow doted patterned paper is from the 6x6 sweater weather collection
the twine is hot cocoa lawn trimmings
the banner and the stitched circle are from the "stitched party banners" die set
All by Lawn Fawn
Other supplies" foam adhesive, stamp adhesive, various Copic markers, Copic friendly cardstok, white cardstok for the card base, "Memento Tuxedo" black ink

If you want to see more of my creations please follow Crafty Time 4U on PinterestFlickr, and Facebook

Thanks for stopping by, your kind comments make my day happier!

Wednesday, November 5, 2014

Holiday Craft Series Day 2 Christmas is coming!


HI, Heidi here with to share another card for the Holiday Craft Series 2014.
Also I"m bringing you a semi-photo tutorial, so you could make this card. I hope you'll like it!


When you cut the mask, leave plenty of room on the bottom, do no cut it by the lines, since the tree overlap the trailer (see pictures above and below).

Remove the mask and don't worry about perfection since you will be fuzzy cutting the image, once it's all colored. 


 Supplies for this card:
"Happy Trails" stamp set, "Milo's ABCs" stamp set, the tree line is from "Snow Day" stamp set, I used second generation stamping to give the appearance that the trees are farther away. All the stamps by Lawn Fawn.
Masking paper, "Falling Snow" stencil by SSS, white embossing paste, "Broken China" distress ink, white embossing powder, "Versamark" ink, white Copic friendly cardstock, red cardstock, various Copic markers.


If you want to see more of my creations follow Crafty Time 4U on PinterestFlickr, and Facebook

Thanks so much for stopping by, your kind comments make my day happier!

Monday, November 3, 2014

Lawnscaping Challenge Guest Designer:


Wow, this is very exciting! This month I have the great pleasure to be the guest designer for one of my favorite challenge's blog, Lawnscaping Challenge.
Today is the first Monday of the month, so there is a new challenge at the Lawnscaping blog: Lawnscaping challenge No. 93 sponsored by Simon Says Stamp, and it's all about pumpkins and fall. So, I hope you'll get out all your Lawn Fawn stamps, dies and/or paper and create a project for this challenge.
For more inspiration go to the Lawnscaping challenge blog and check out what their design team had created for this challenge.
Fall is one of the most beautiful times of the year so there is plenty of inspiration out there!
This is the card that I created for this challenge, I hope you'll enjoy it!
Instructions and supplies are bellow


Supplies: 
For this card cut a white cardstock panel using the largest stitched rectangle form the "stitched rectangle stackables", then I used some blue distress ink to created the appearance of sky.
Next, I cut a hill and a grass border from green paper from the "sweater weather" 6x6 paper pad, using the "stitched side hills" and the "grass" border dies.
I applied a little of darker green distress ink on the grass to make it stand out.
I cut three trees from the 6x6 "sweater weather" paper pad with the "sweater weather" lawn cuts, and modified two of them.
I stamped the Happy Fall sentiment from the "sweater weather" stamp set, first with brown ink and then I stamped one more time a little off set  with orange ink, and make a little banner, which I also distress with some tea die ink.
I stamped, color (using Copic markers), and die cut some pumpkins from the "so thankful' stamp set as well as some bunnies from the "snow day" stamp set, and some leaves from the "sweater weather" stamp set.
After I played with my die-cut images and decided where I want them, I adhered them to the panel using small dots of liquid glue and a quick stick.
Finally I adhered my scene panel to a white card base.

Don't forget to check my previous post as my "Holiday Craft Series" started yesterday, I will see you tomorrow with a new post for the series.

If you want to see more of my creations please follow Crafty Time 4U on PinterestFlickr, and Facebook

Thanks so much for stopping by, your kind comments make my day happier!!!

Sunday, November 2, 2014

Holiday Craft Series 2014 Day 1


Hey Heidi here, ready to start the Holiday Craft series 2014, I was planning to start tomorrow Monday November the 3rd, but tomorrow I will be having a special post, that I hope you won't miss. 
If you follow me on Flickr, you probably already had seen many of my 2014 holiday cards. I going to start the series with a very special card that I made using a very cute stamp set: The Alpine Carolers from Mama Elephant, I want to start with this card because I want to enter it to the Mama Elephant and me November challenge, which, is all about holiday cards.
I hope you'll like it!
Instructions and supplies are below.  


Some instructions and supplies:
I used the picture frame from the "Instalove" creative cuts from Mama Elephant to created a window (see picture above), if you have a window die that would fit your carolers you could used it, if not this is how you could created your own window. I distress it a little bit using "old paper" distress ink.
For the back ground I stamped two times the skyline of buildings from the "Central Park" Stamp set from Mama Elephant, I use black and grey ink for that. I also used some "broken china" distress ink to create the appearance of sky, and then I used a light yellow marker to fill in the windows on the buildings.
I die-cut some snowy hills using the "Landscaping Trio" creative cuts dies, from Mama Elephant and sponge a little bit the edges with light blue ink.
I used the very lightest part of the falling snow stencil from SSS to create some falling snow with texture paste.
I stamped, colored (with Copic markers), and die cut the carolers, from the Alpine Carolers" stamp set from Mama Elephant, I chose the tree carolers to resemble my own family (my husband my little boy, and I), and placed them on the snow.
I also stamped, color, and fuzzy cut some ornaments from the same stamp set, to decorate my window. I placed all of my elements on the scene and adhered them using little dots of liquid adhesive.
I stamped the “From my family to yours" sentiment from the "Alpine carolers" stamp set, and created a little banner with it, which I sponged with a little bit of "old paper" distress ink.
I pop the window over my scene with some foam adhesive.
Finally I adhered the window with the scene to a red note card that I stamped with a brick background.

Thanks for stopping by, your kind comments make my day happier!